Category Archives: 1.2.5. Other Stuff

Fire Brigade Dice Tower (MOC)

A dice tower built in the typical red an white fire brigade colour scheme.

Playing board games with a seven year old boy can be a real challenge with the dice rolling everywhere where it should not. So I decided to build a dice tower to solve that problem as good as possible.

There can be found a lot of similar designs anywhere in the net, so the basic design of a such a tower was easy. I just wanted to add two functions: A detachable lower deck for compact storage and kind of a door to get the dice from the platform in an easy way.

I wanted to build two for Christmas – one for my son and one for my mother – and the total cost of the bricks shouldn’t be a big investment. So I chose to use mostly common parts and colours to keep the cost lower. Red and white were a good choice, so the idea of a fire brigade theme for the tower was born.

A few hours with LDD and three Bricklink Orders later everything was on the way. This is the result. You can see the left tower with the detached platform mounted on the rear side of the tower for compact storage. The right one is ready to play.

This is how it works: Throw the dice into the opening on the top, the two small ramps inside make it bounce from one side to the other and back, and finally the “Quarter Pipe” on the bottom will make it roll onto the platform. Then you can just pick the dice or open the front door to get them. No more dice “flying around” on the board or the floor… :-))

Fire Brigade Dice Tower (MOC)

The detachable platform: The platform is fixed to the tower with a pair of long Technic pins with friction and additionally guide by two axle pins on the other side.

On the rear end of the tower there are two of my new favourite SNOT bricks (1 x 2 x 1 2/3 brick with studs on one side) to attach the platform. This way you need less space to store the tower next to your board games.

8846 Tow Truck Reloaded (Studless Technic)

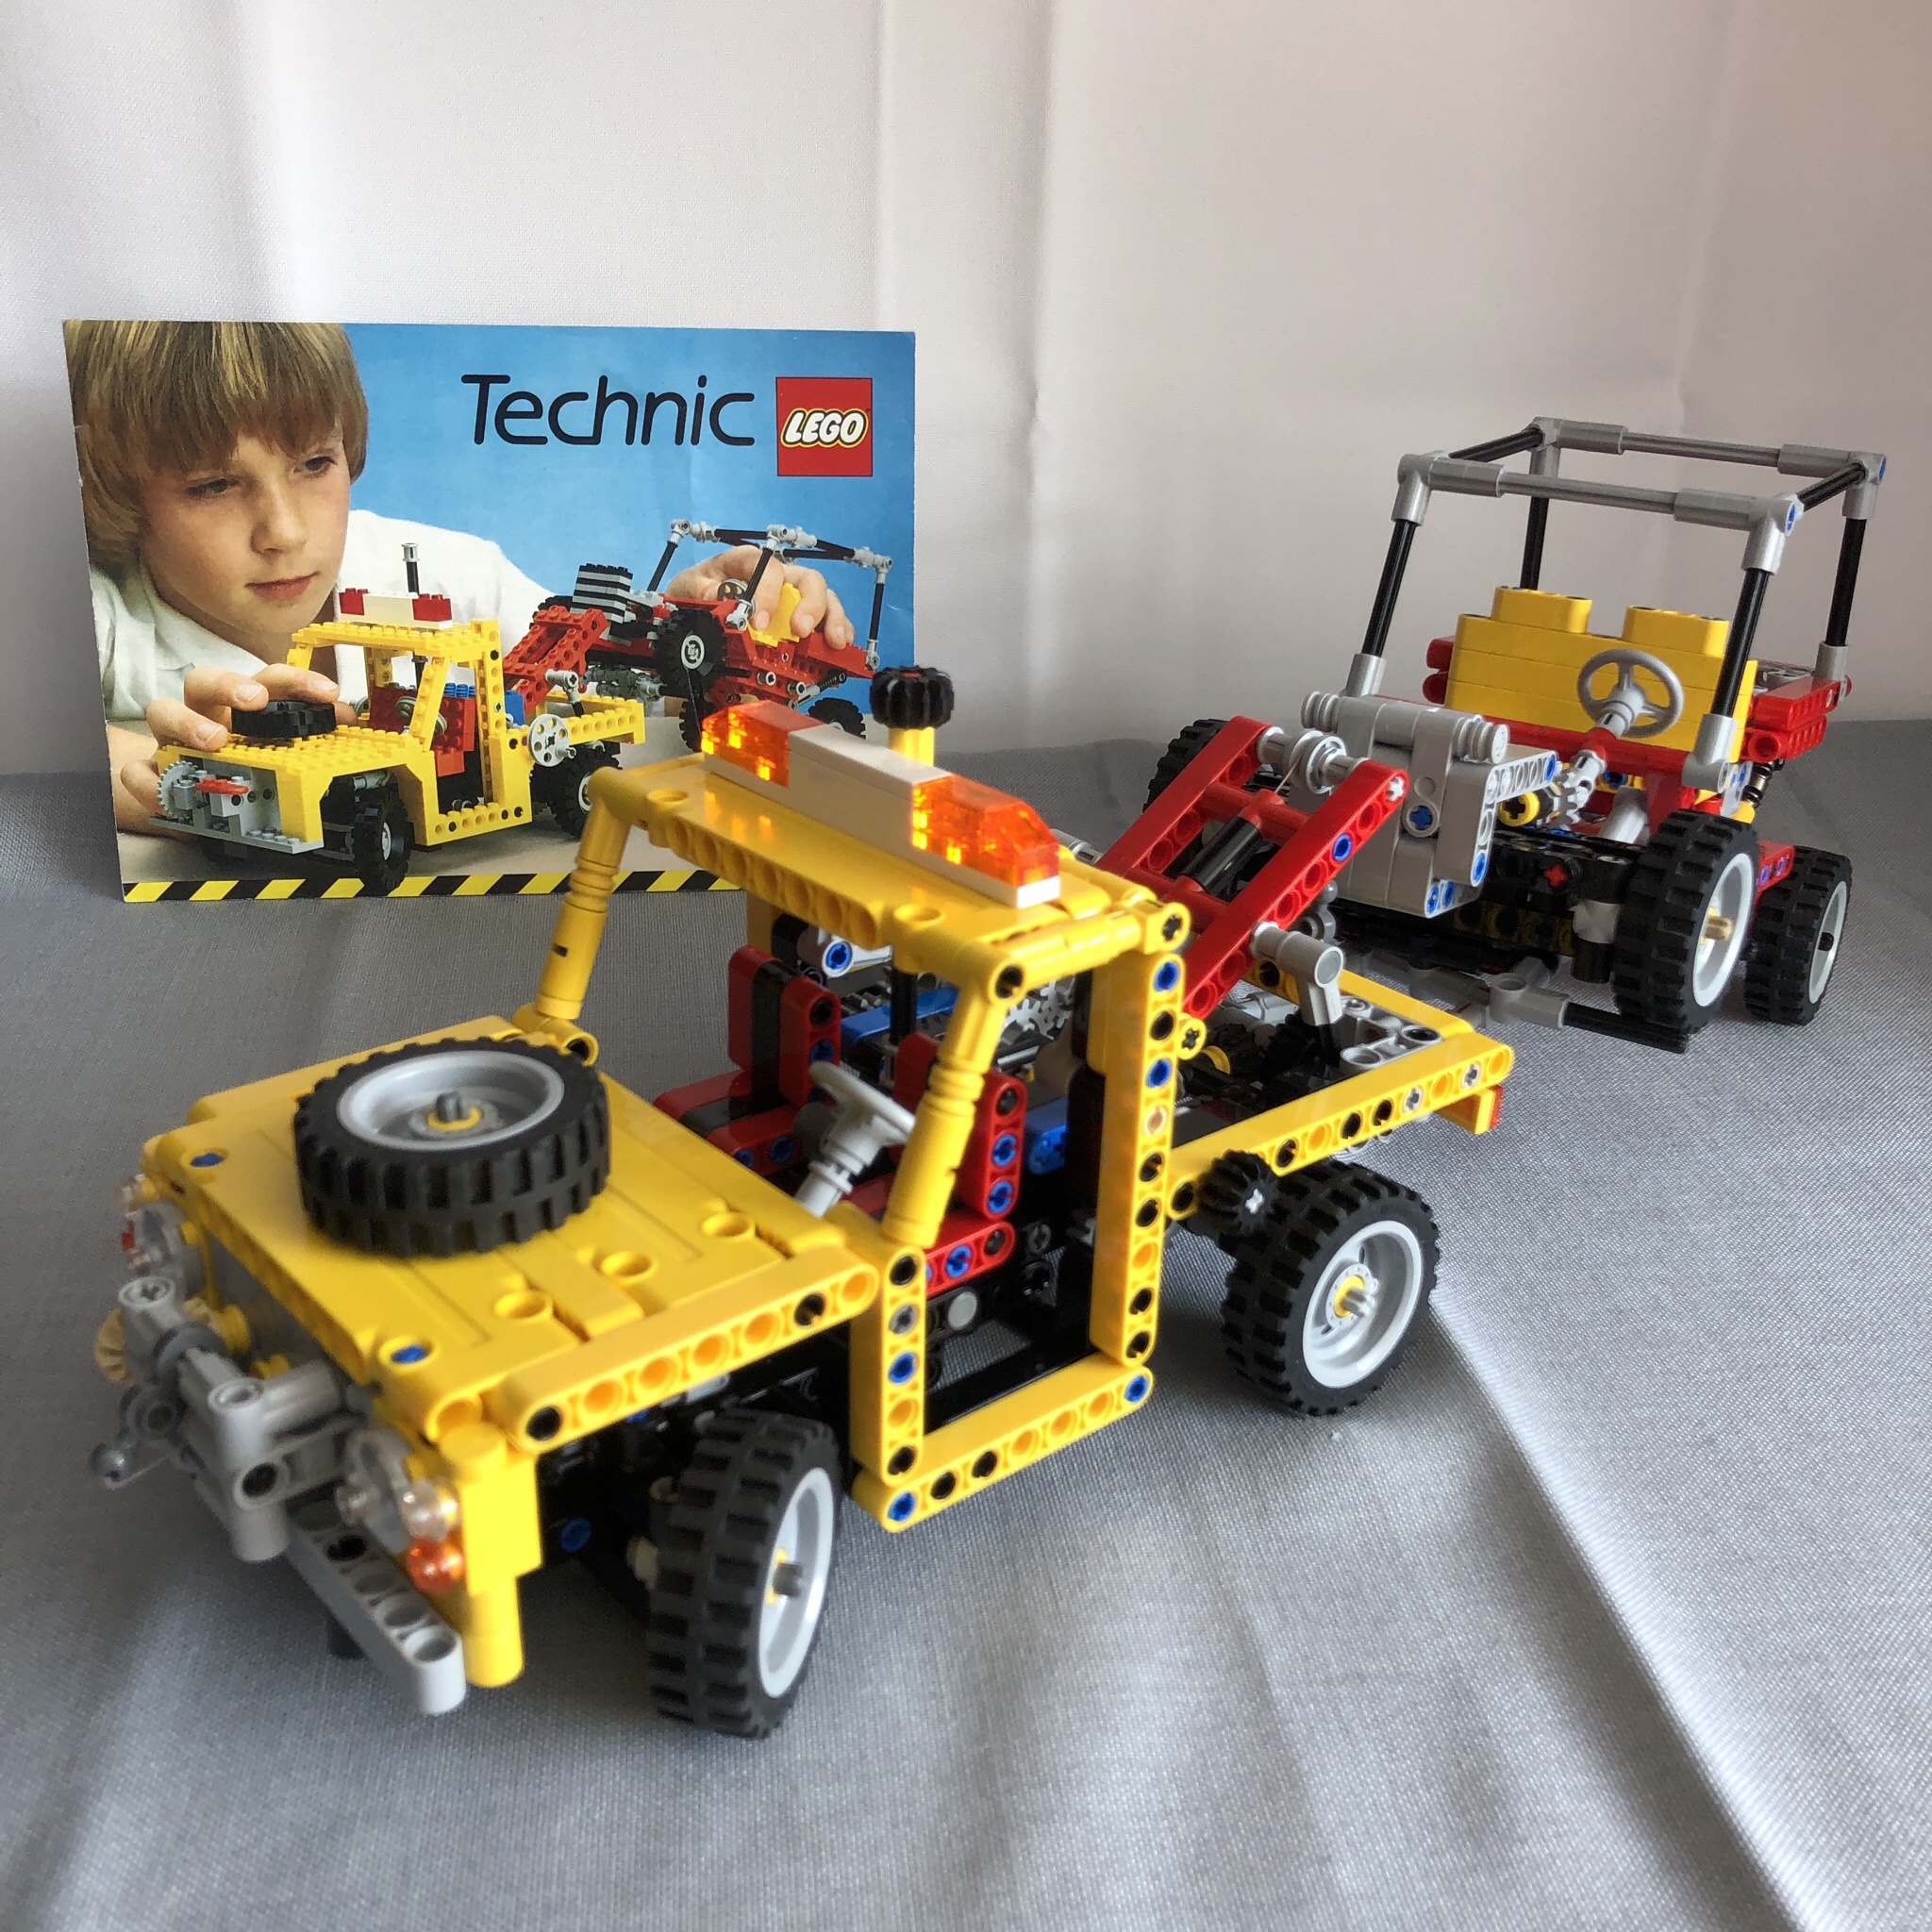
My studless version of the classic Technic 8846 Tow Truck from 1982

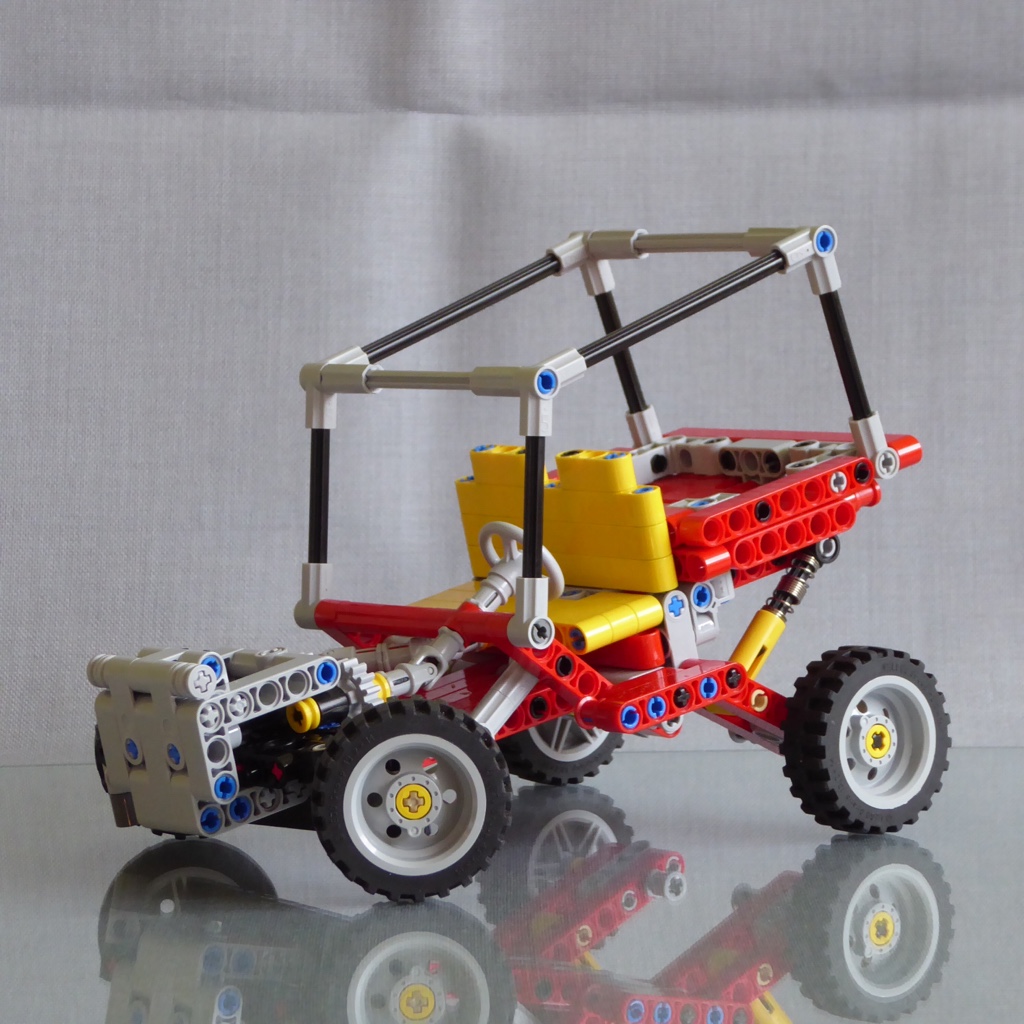
As a kid I was a big fan of the 8845 Dune Buggy. I also liked the matching 8846 Tow Truck on the cover of the Technic catalogue but unfortunately never got one as a kid.

There was no Internet, no Bricklink and the sets only remained in the stores for a year or so. So if you spent your pocket money on other things that year and didn’t get a set for Christmas or your birthday, you didn’t get it at all.

Well, times are changing and a few years ago I found a set at a fair price on Bricklink and finally, finally got this set. Back then I had already built a studless version of my beloved Dune Buggy, so the idea for a studless Tow Truck was there immediately. There were other projects in the making, so it took its time.

Now with some finished projects and Corona lockdown I’ve found some time to dedicate to this project. I wanted to get shape and dimensions as close as possible to the original, so I started to build the original model with LDD and the studless version right next to it.

I know I’m not the first one to do this. There is a digital model built by Arne Didrik on Rebrickable and a cool movie of another model built by PG Play on Youtube. Both models were inspirational, but I decided to built my own one from scratch with the original 8846 as my only reference.

The model is quite complex for its size with some pretty functions packed into a rather small space. So it got a little tricky here and there but I was finally able to build a model with the right shape and all functions.

This is it.

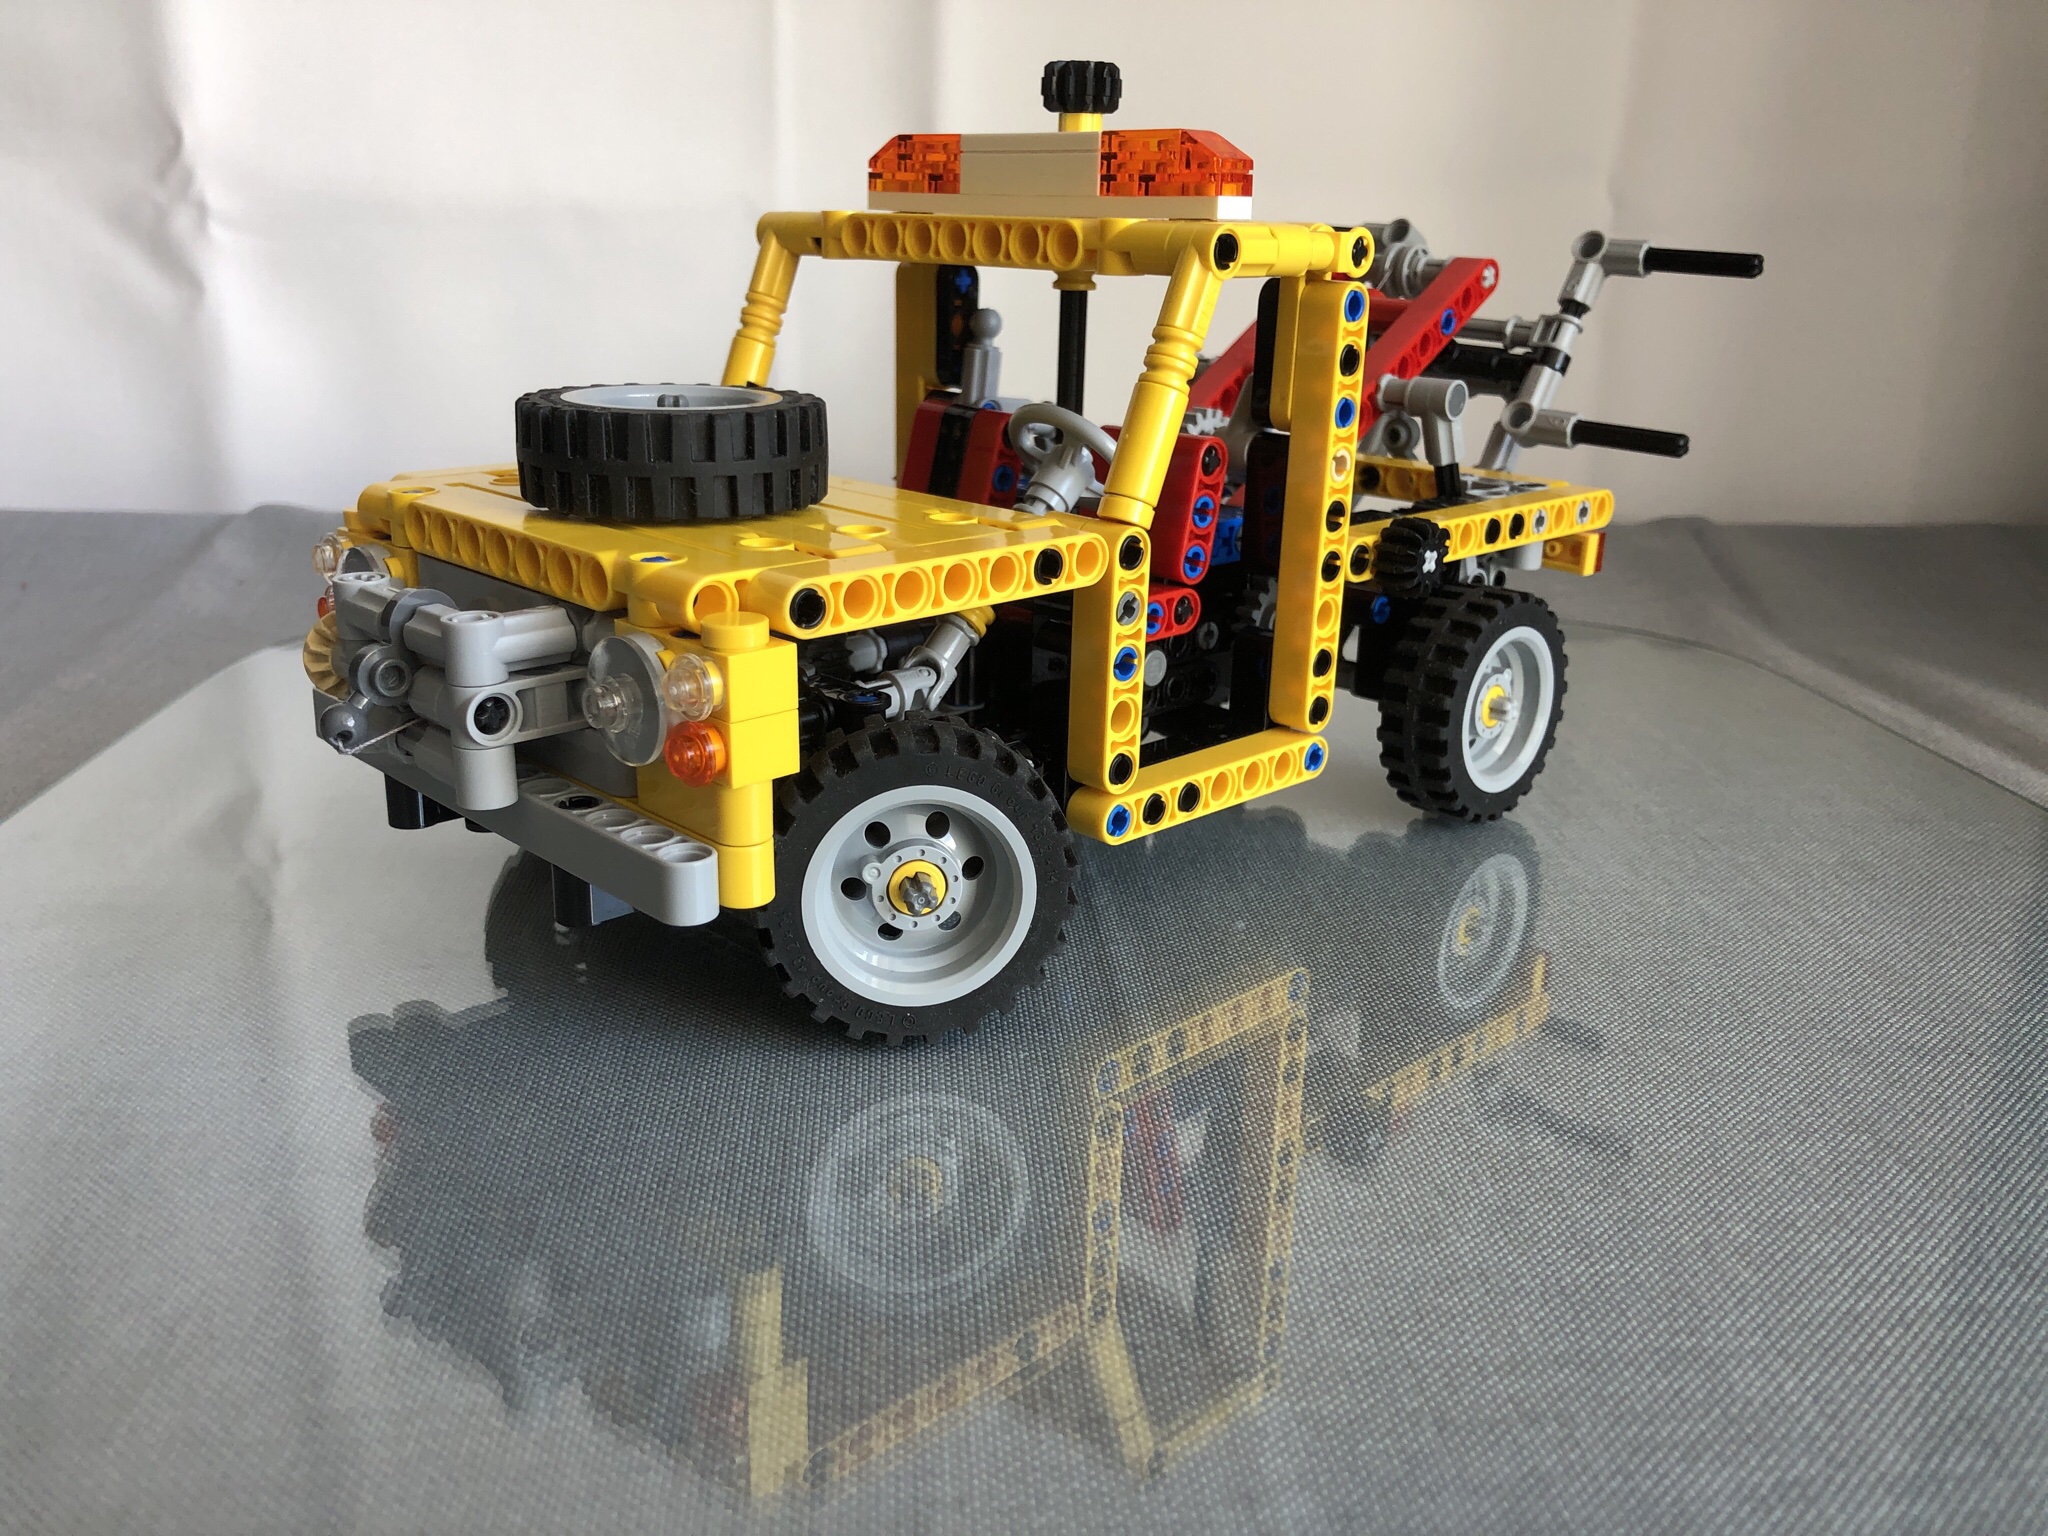
The original model didn’t have headlights or taillights, probably to reduce costs. But I didn’t want to leave it that way. As 8846 has always looked like a Land Rover Defender I added headlights similar to a Series III model.

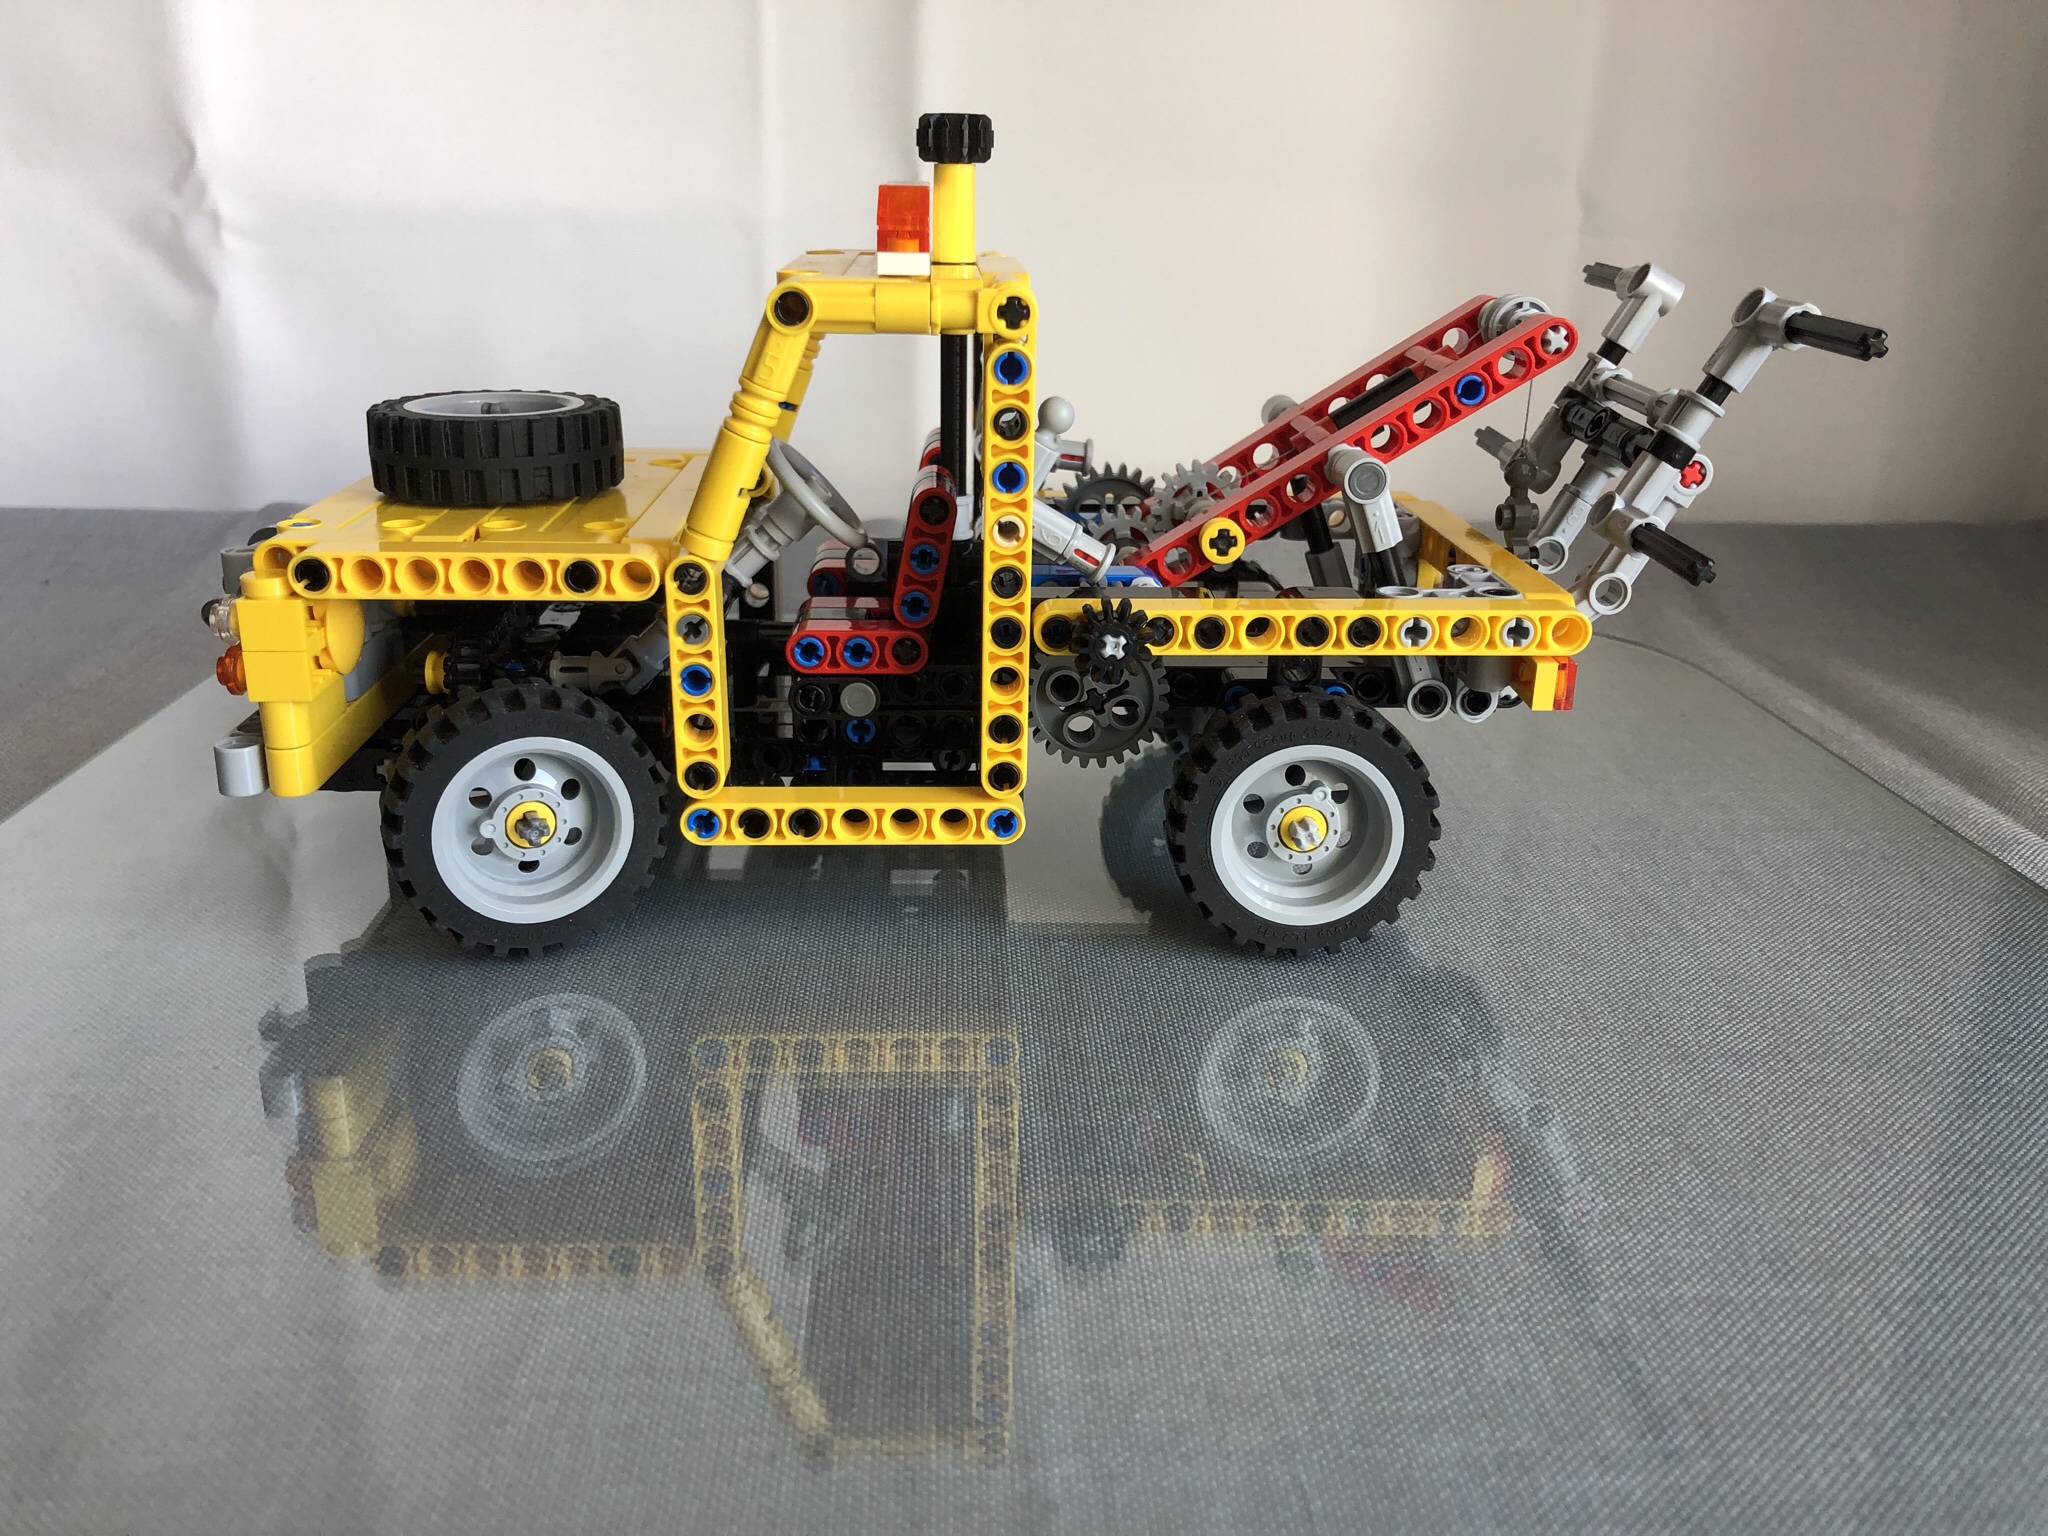
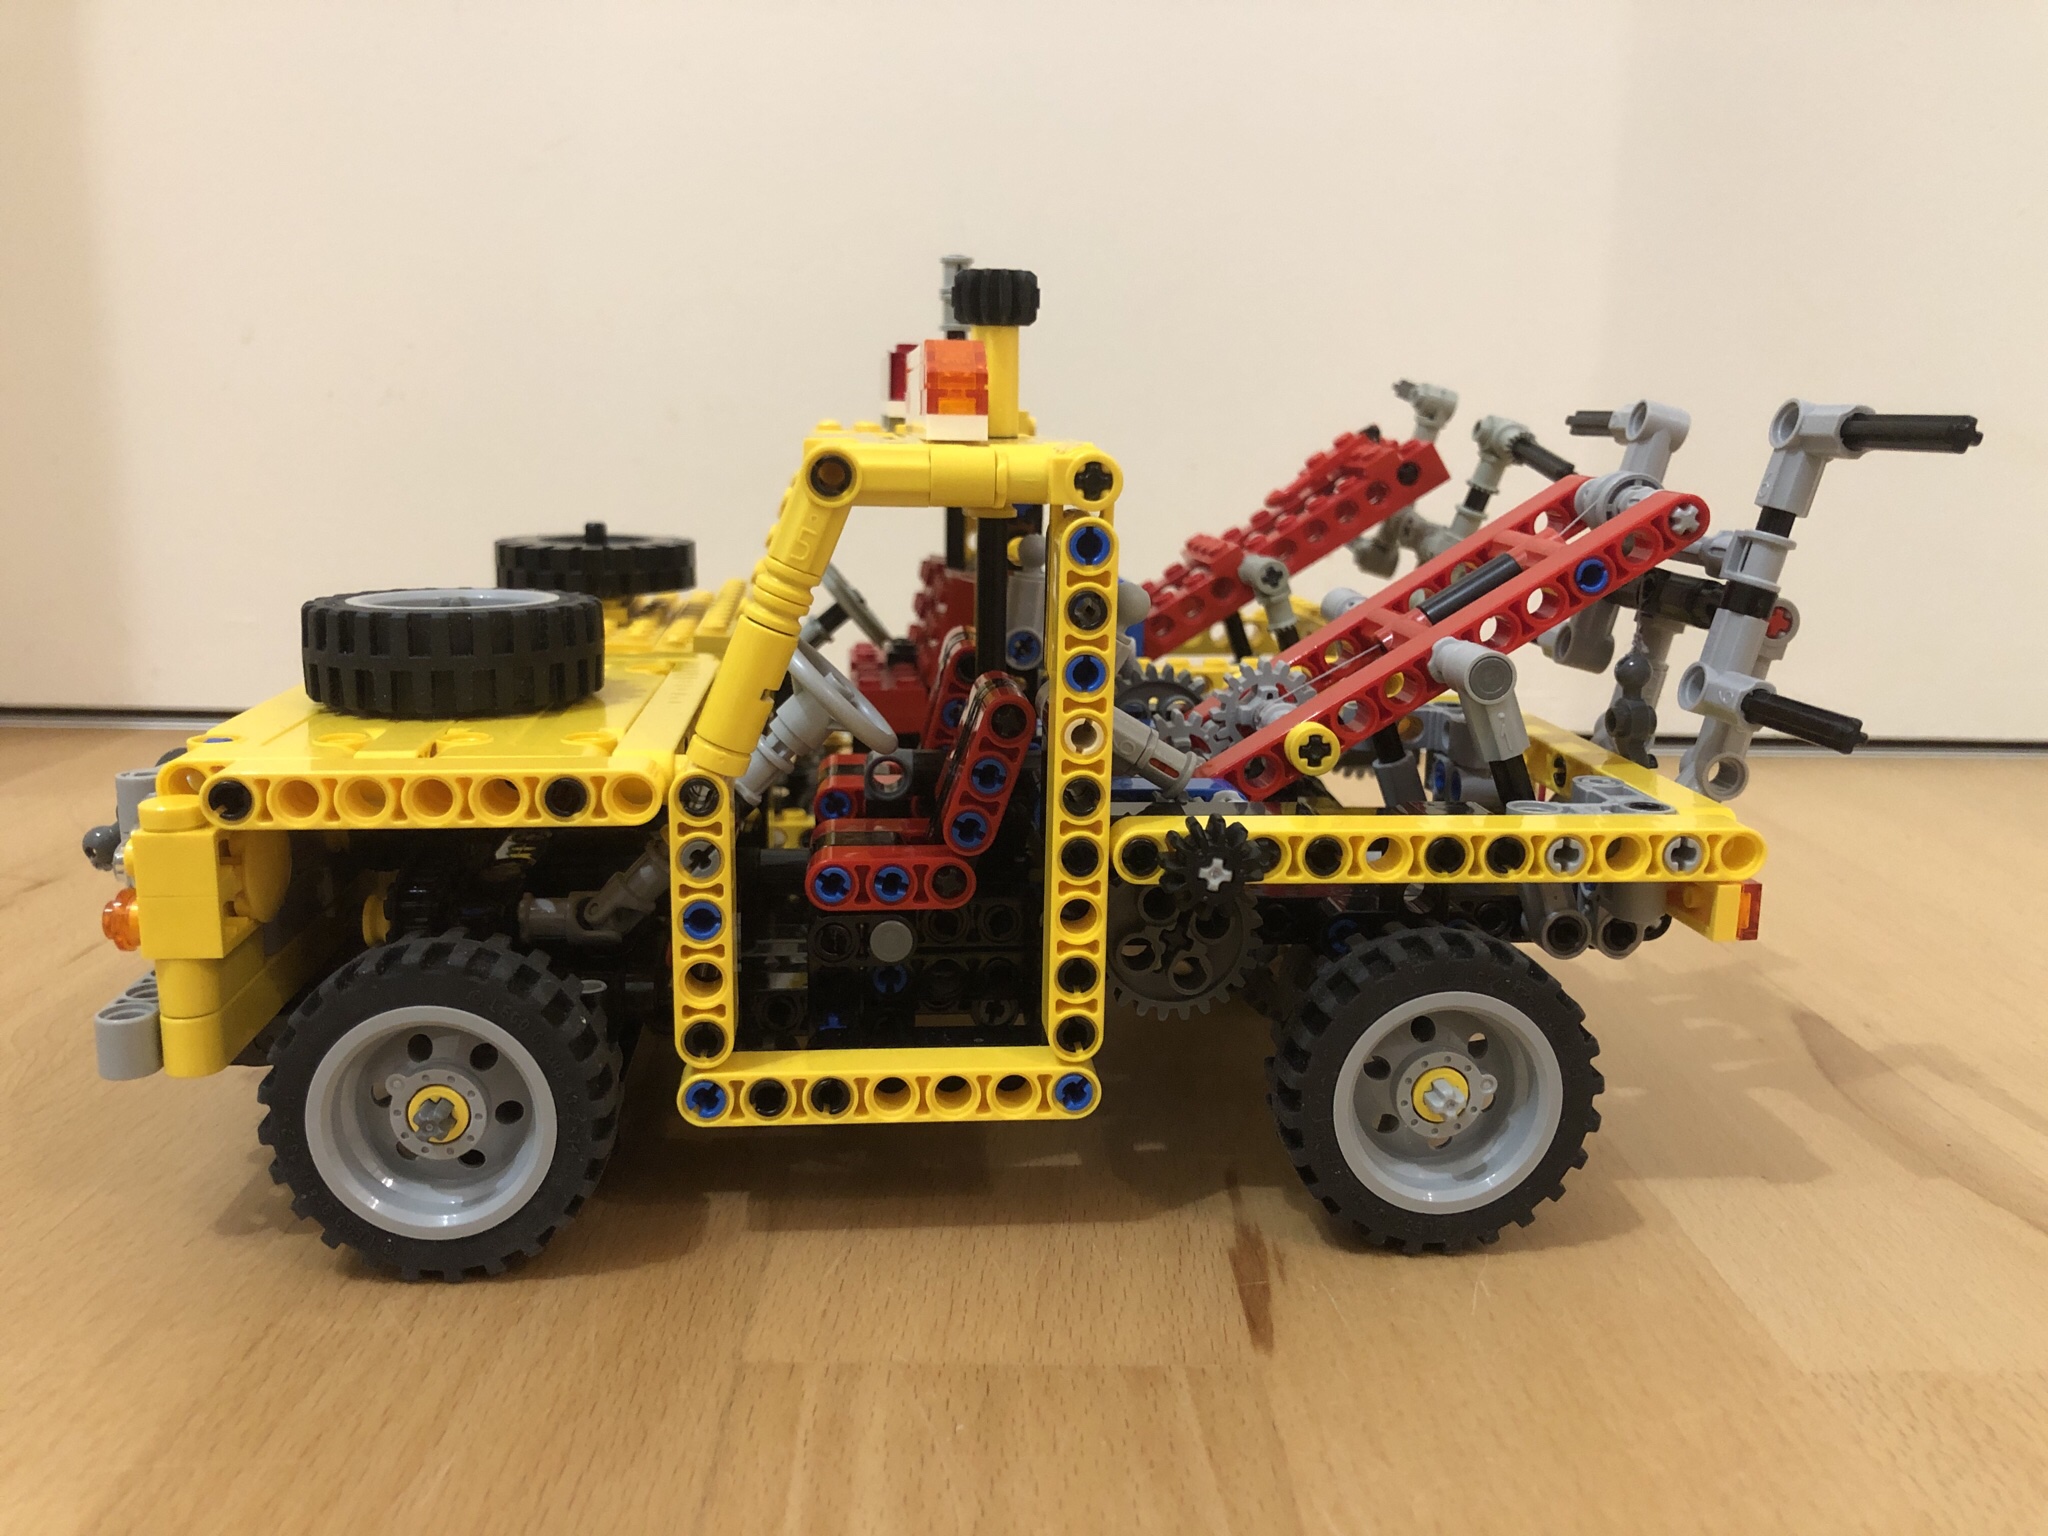
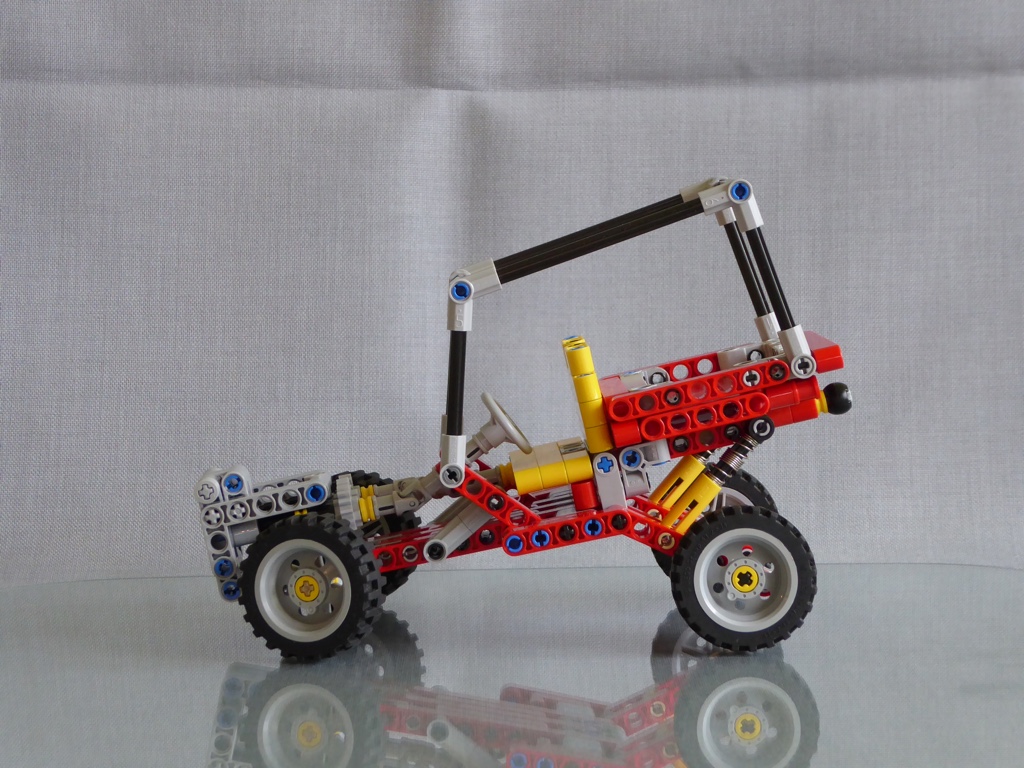
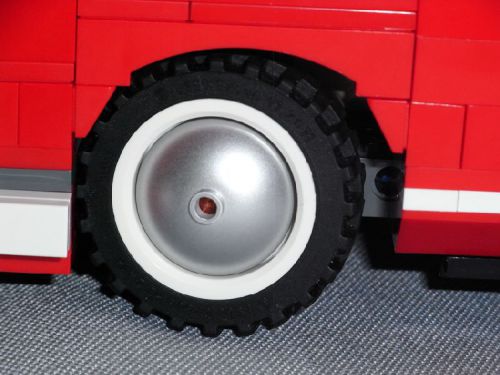
Side view: As usual on the classic Technic models the bodywork looks more like a frame than sheet metal parts. All lift arms have the same dimension as the beams on the original model

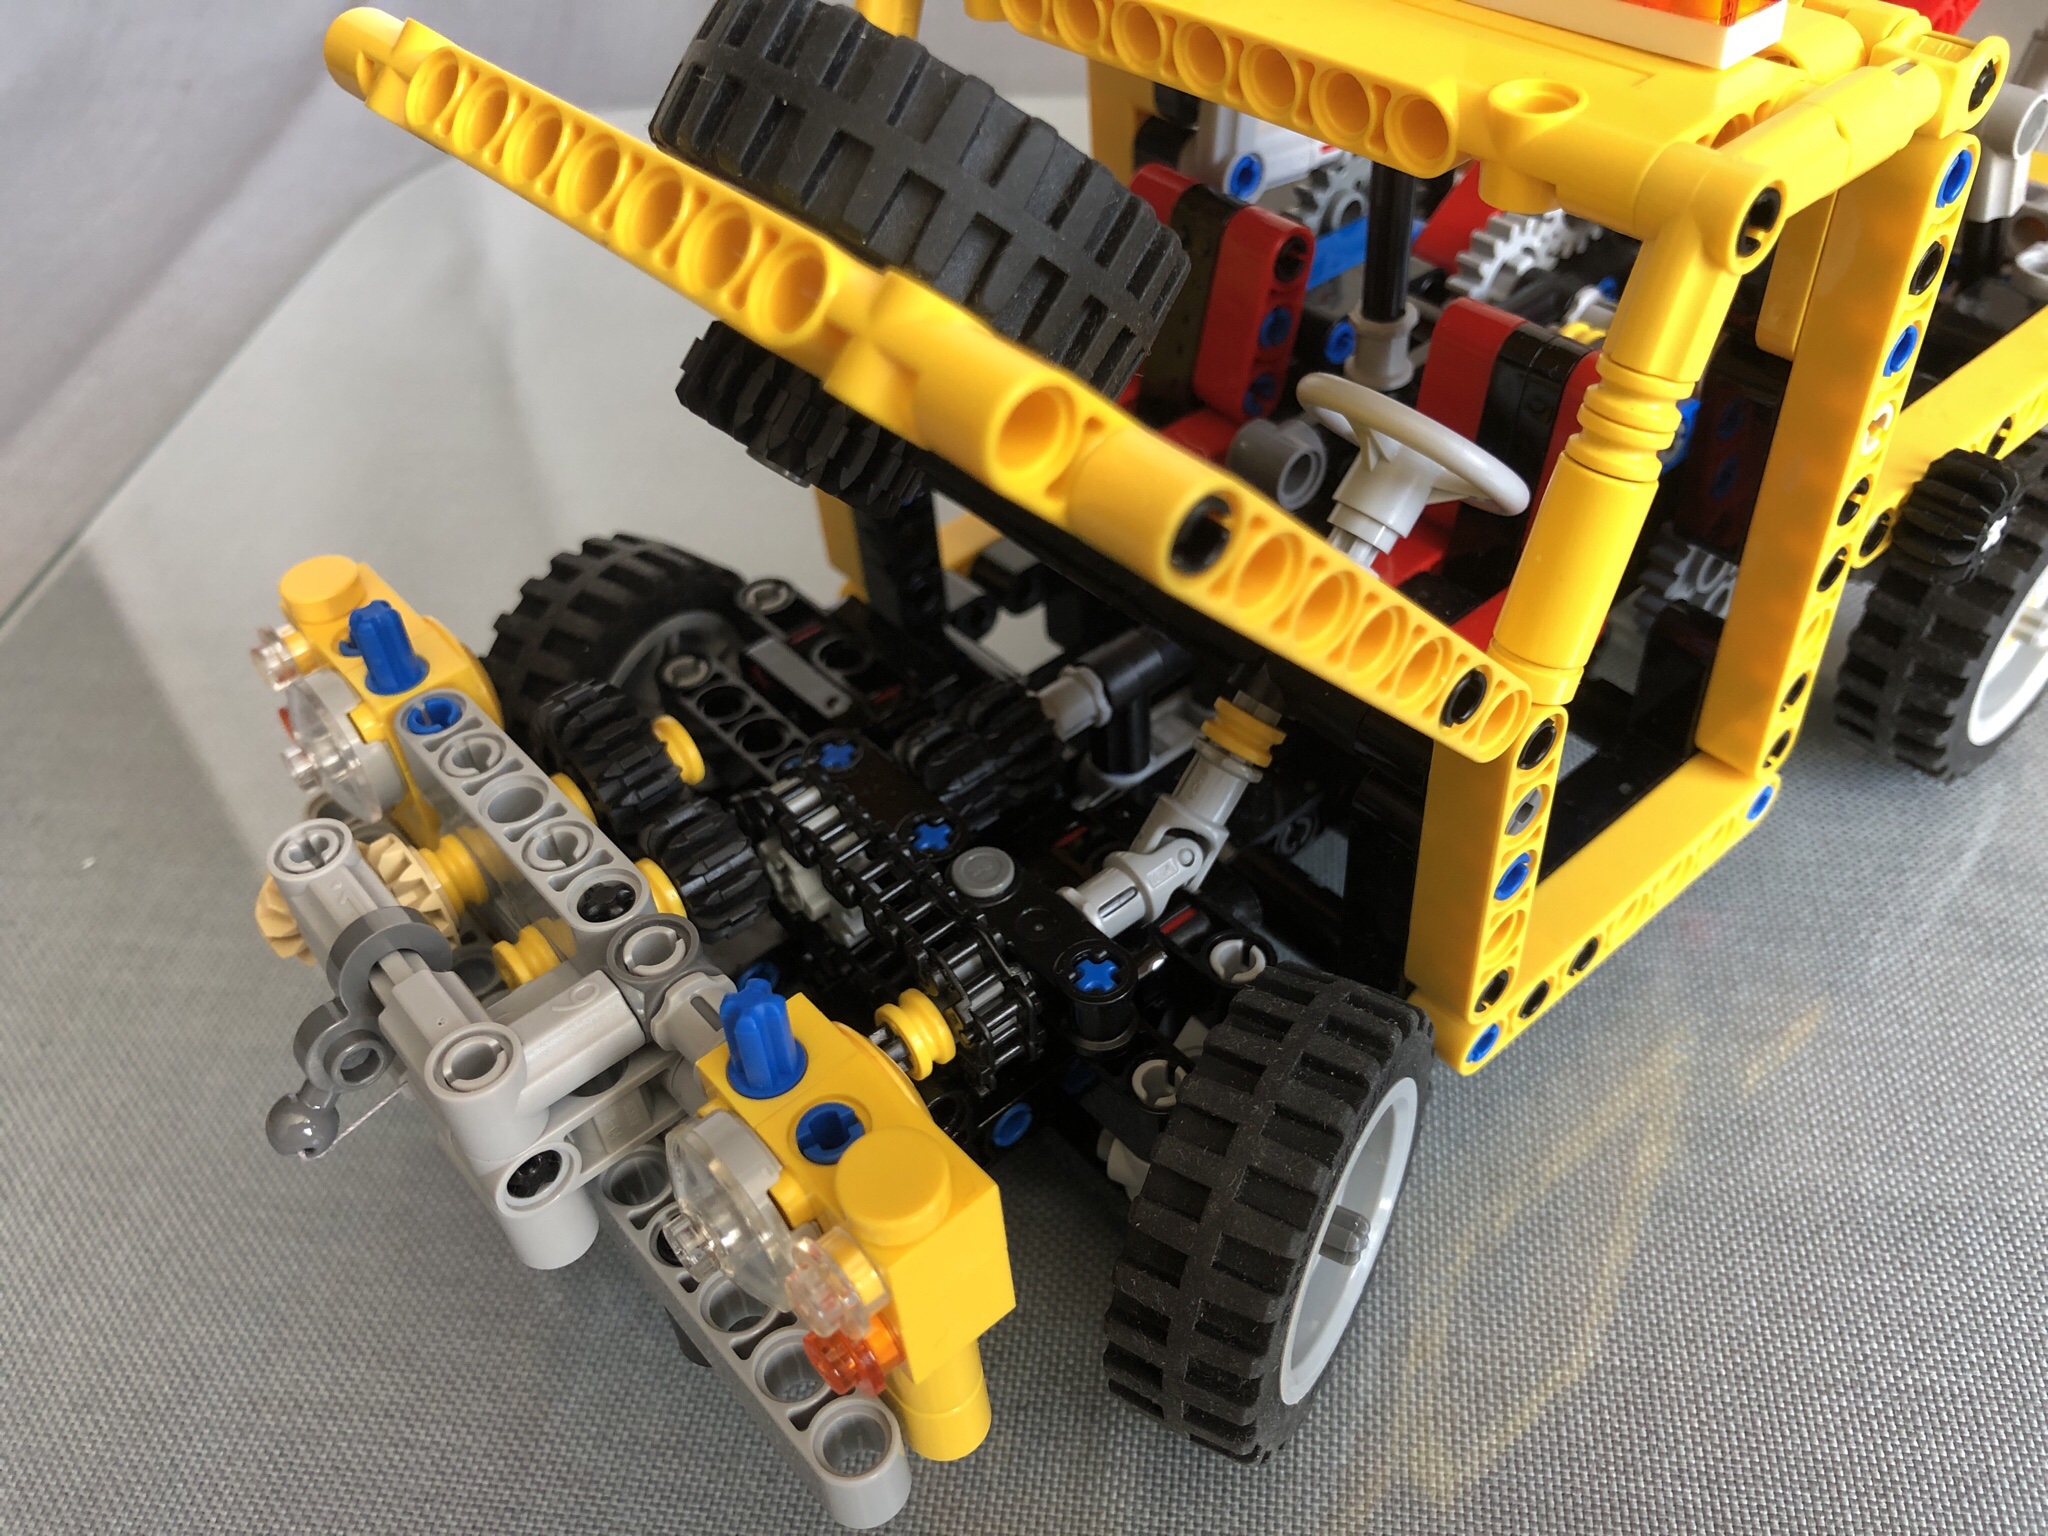
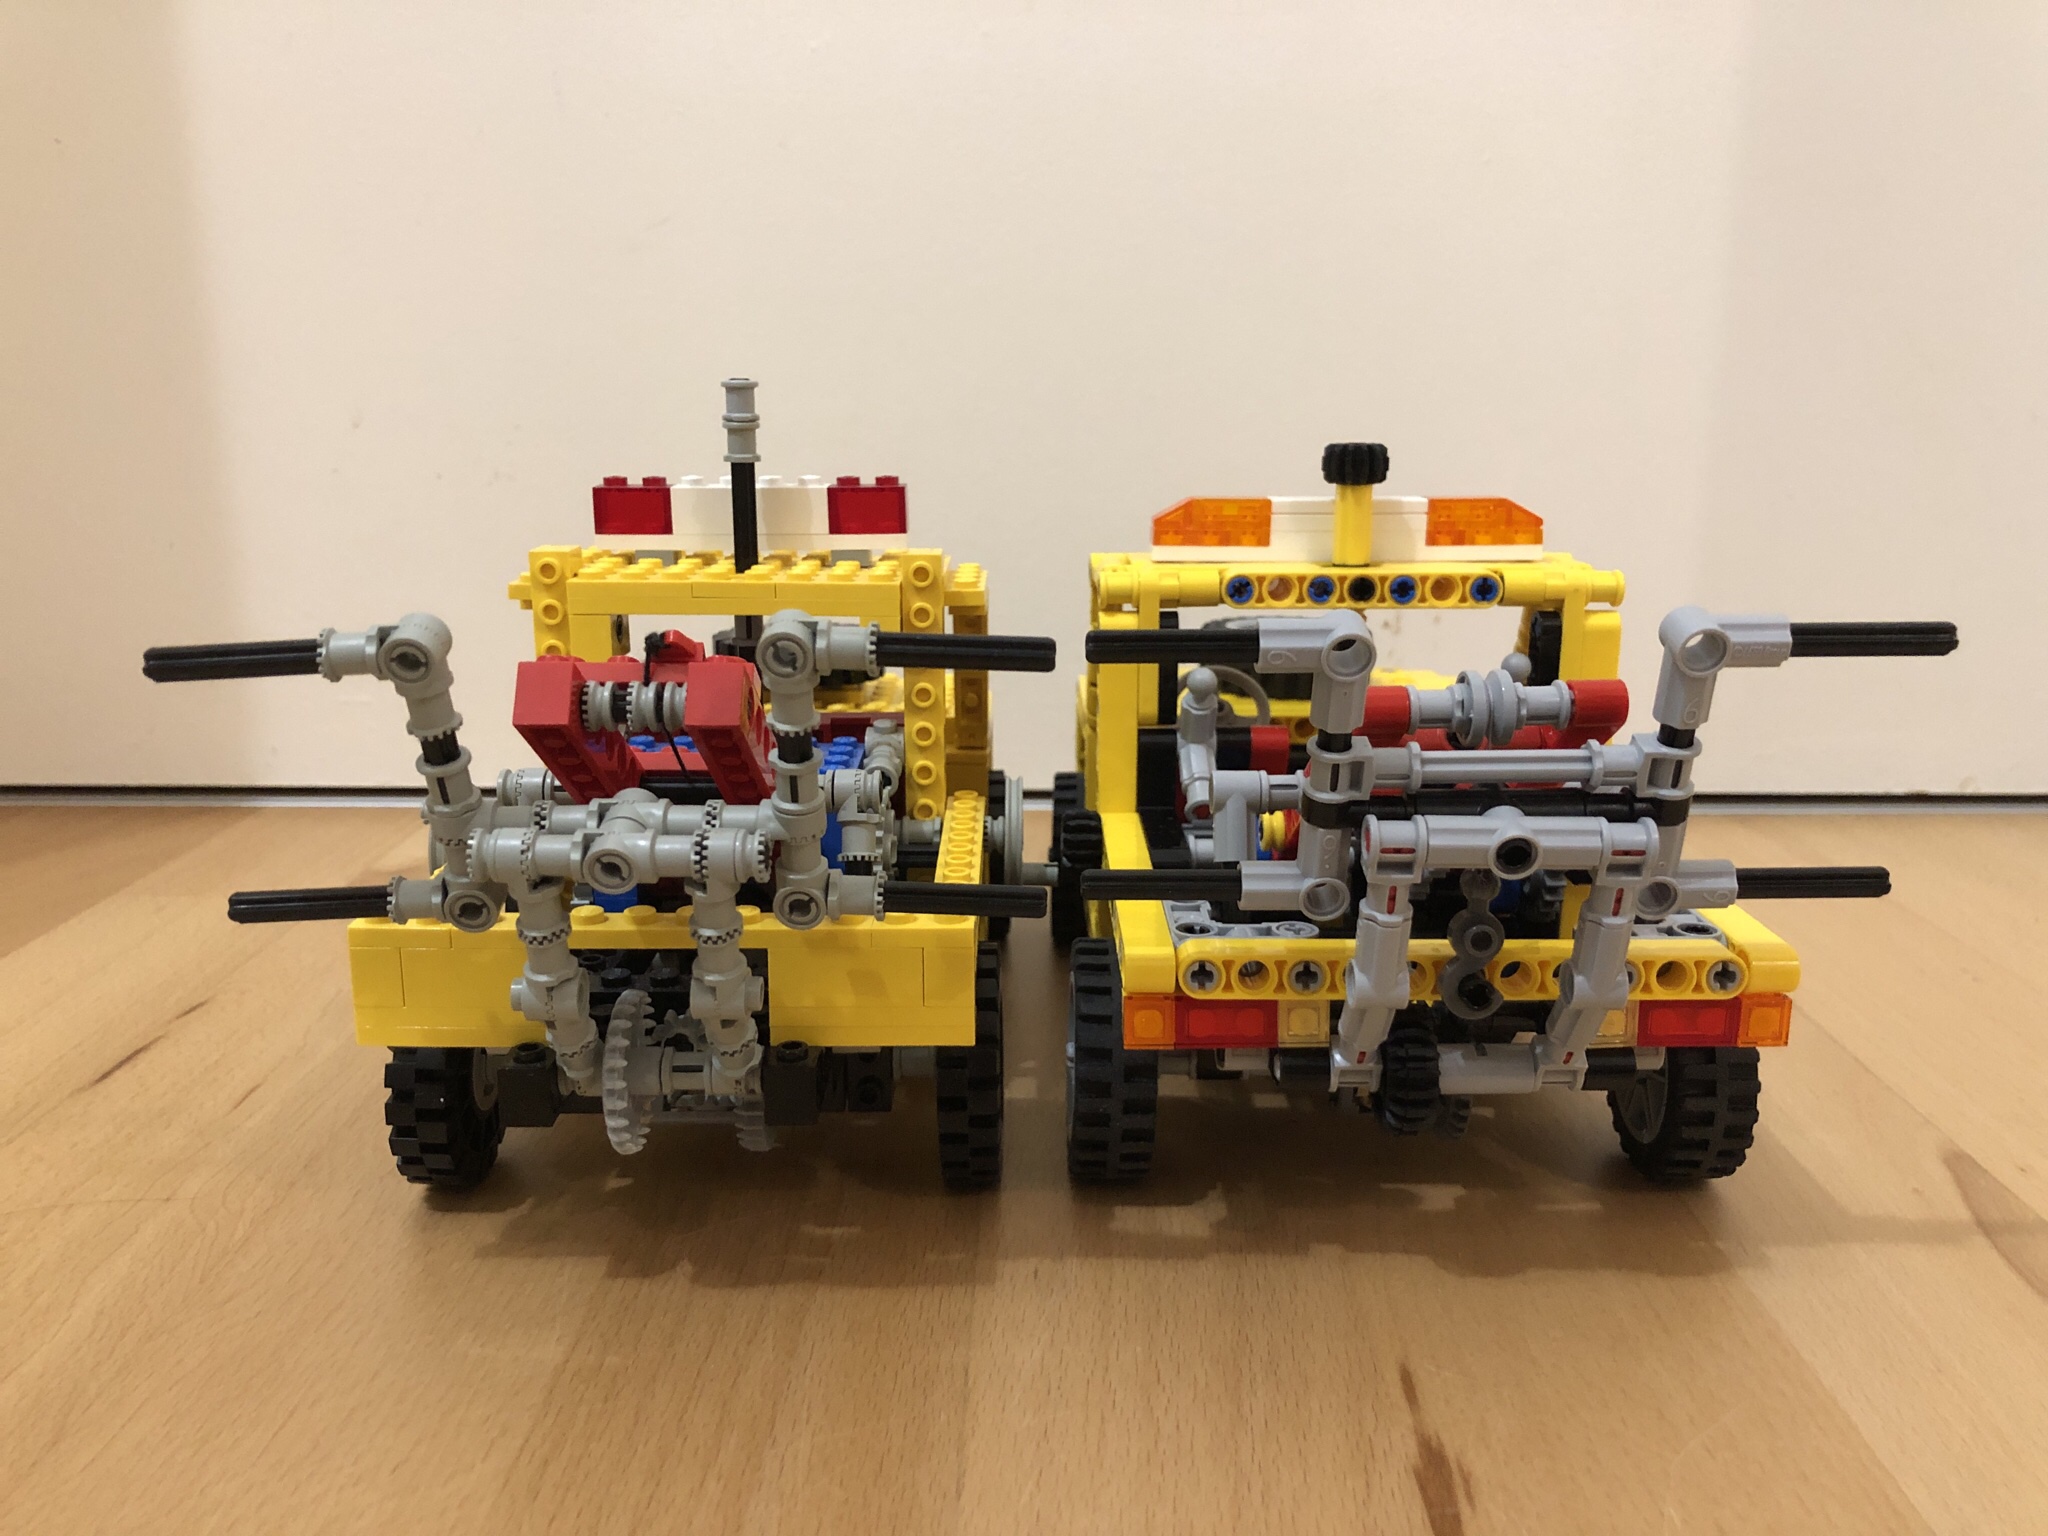
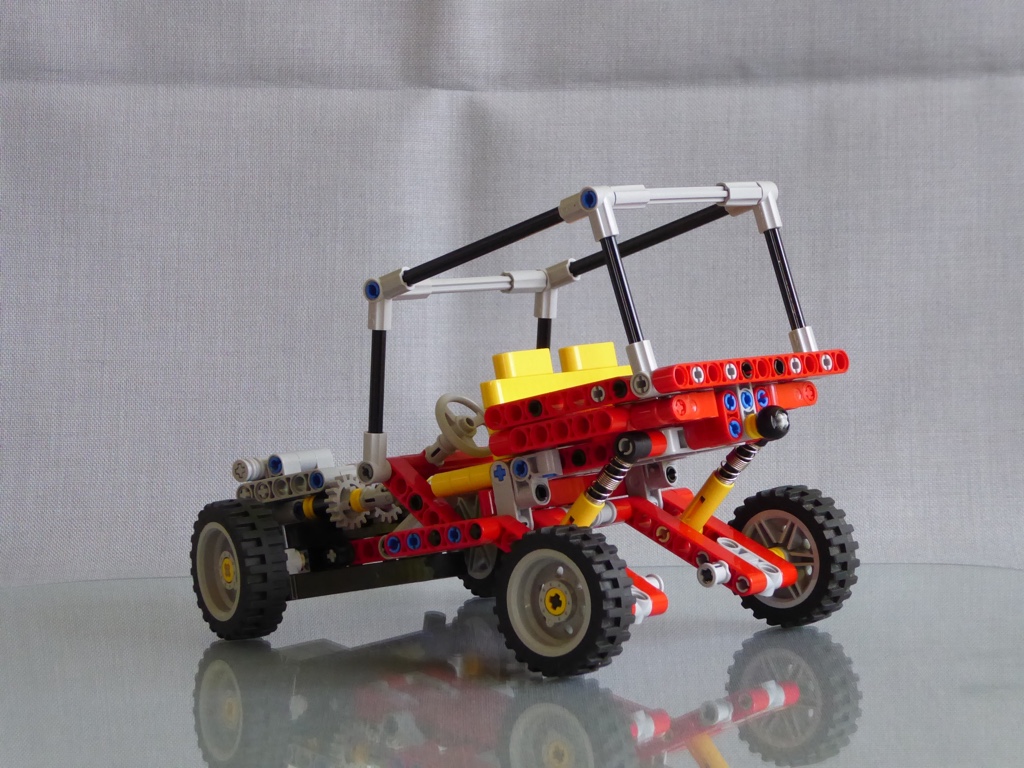
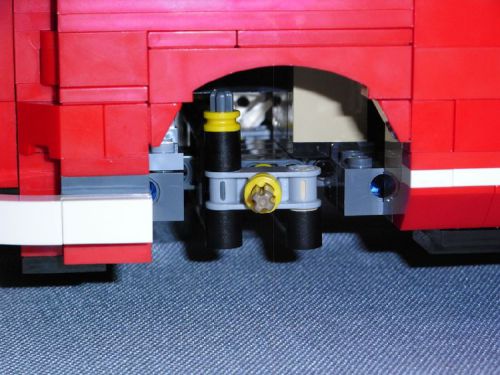
Rear end: There is just minimal bodywork with a visible frame and axle. Like on the original model I’ve kept the differential without connections to a power train. I’ve also added some simple classic truck tail lights. I didn’t find many pictures of Land Rover tow trucks and they all had different tail lights, so I had a free choice.

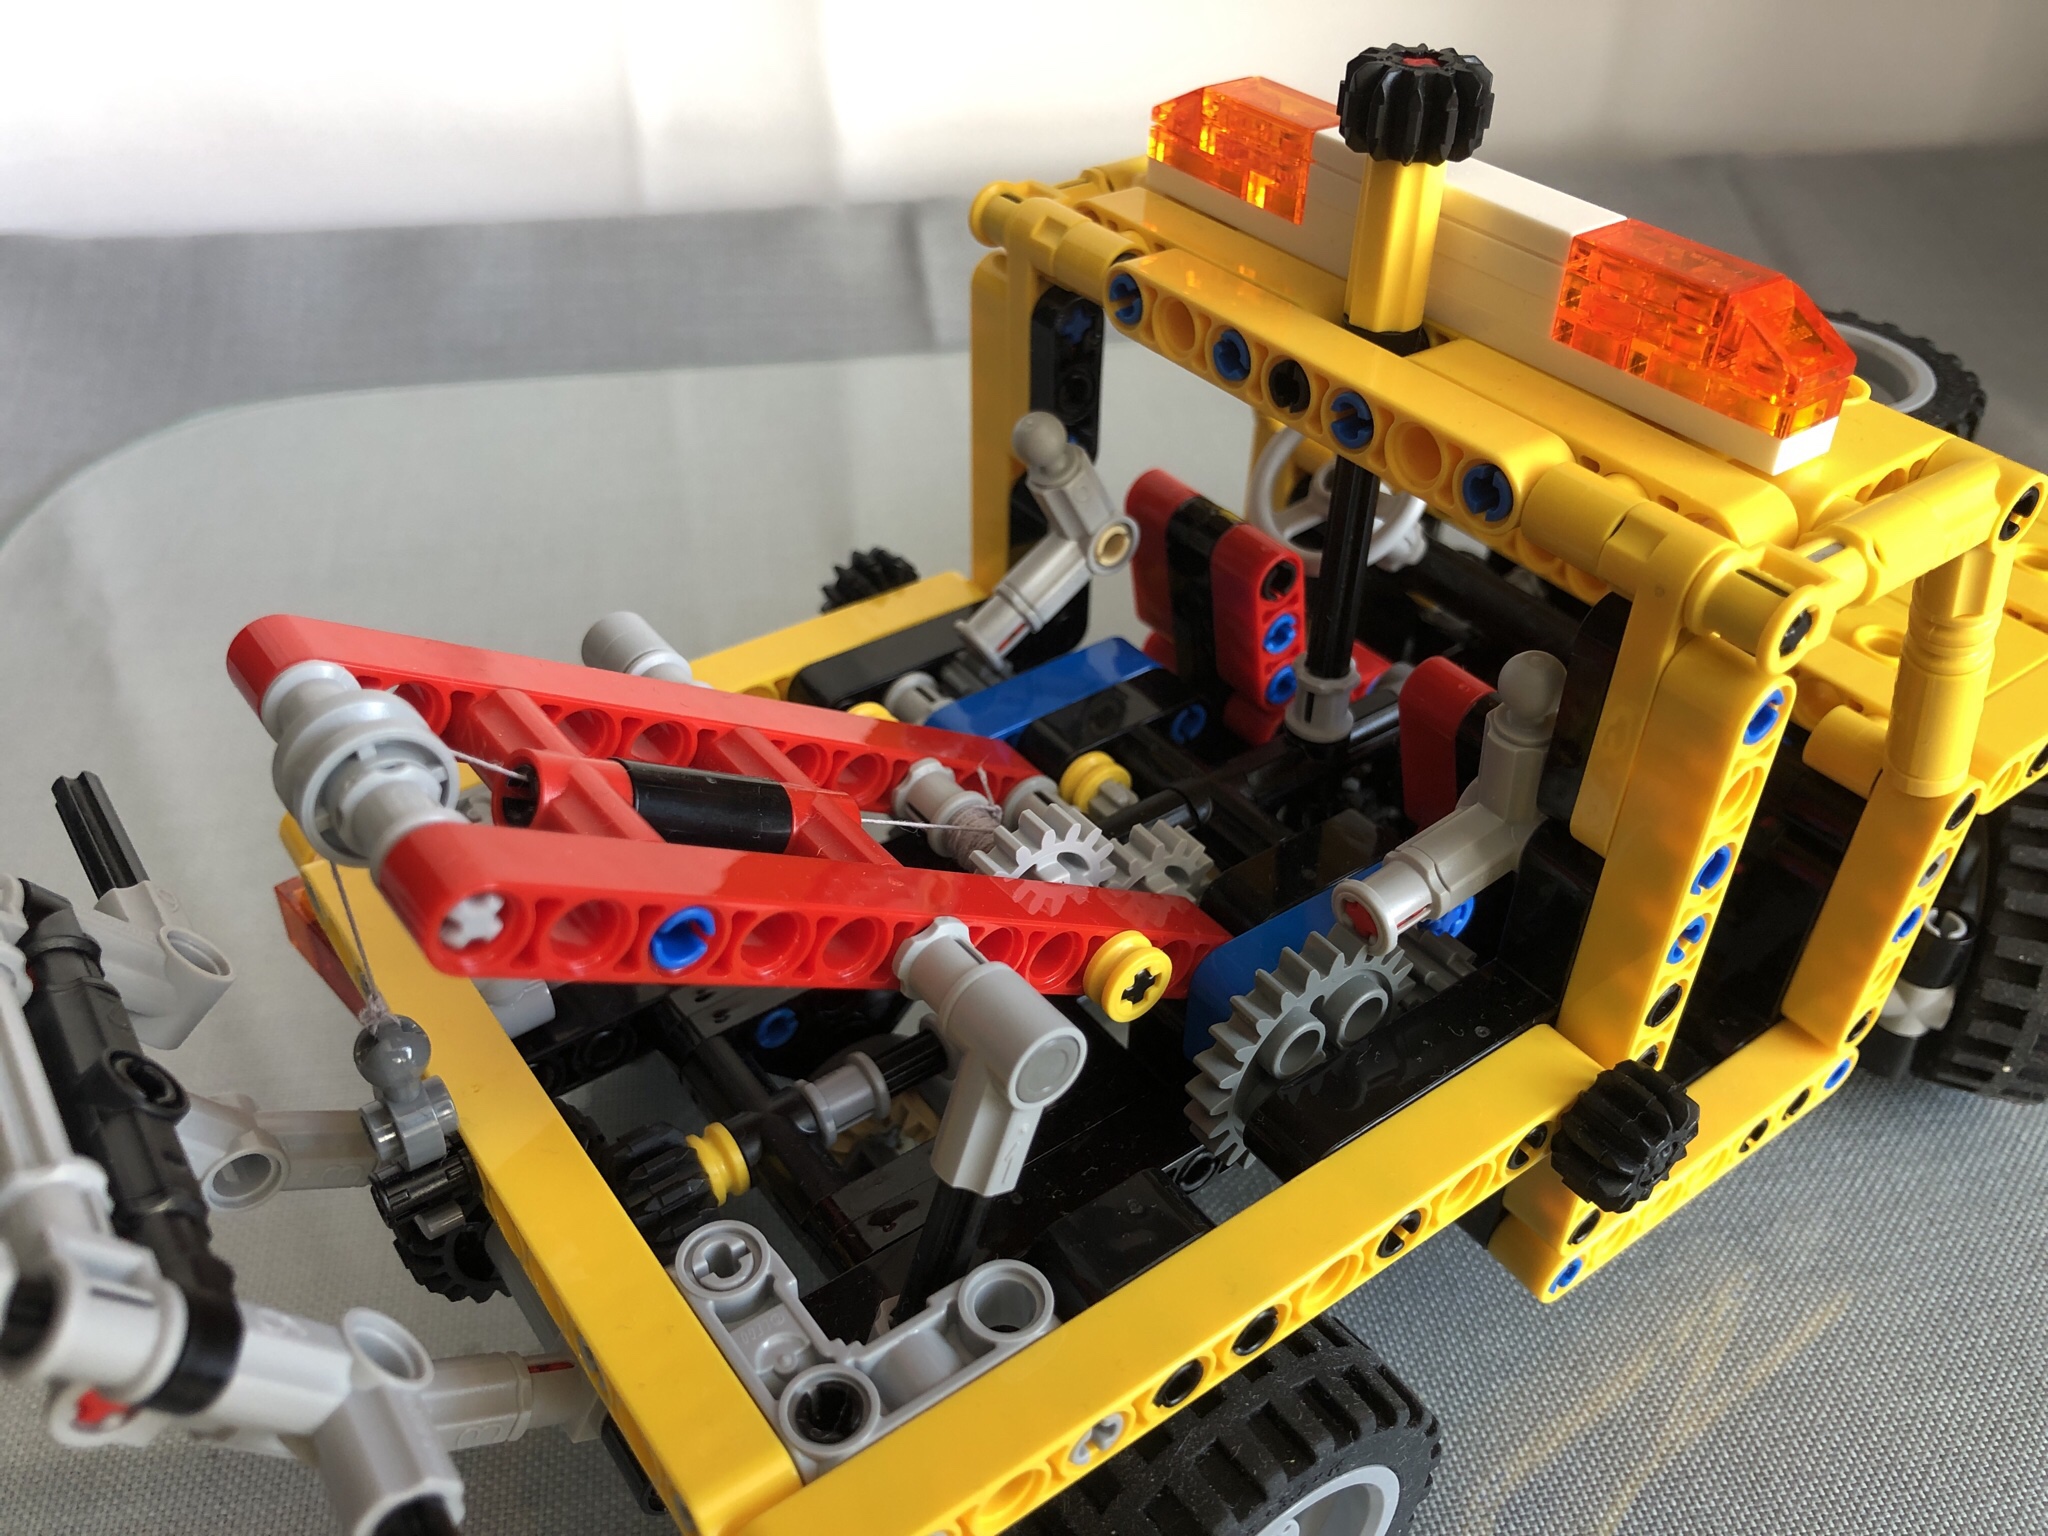
Another view from the front. I really like the look of the head lights. I decided to add a more modern set of emergency lights on the roof. The original had red ones, but for me orange ones look a lot better.

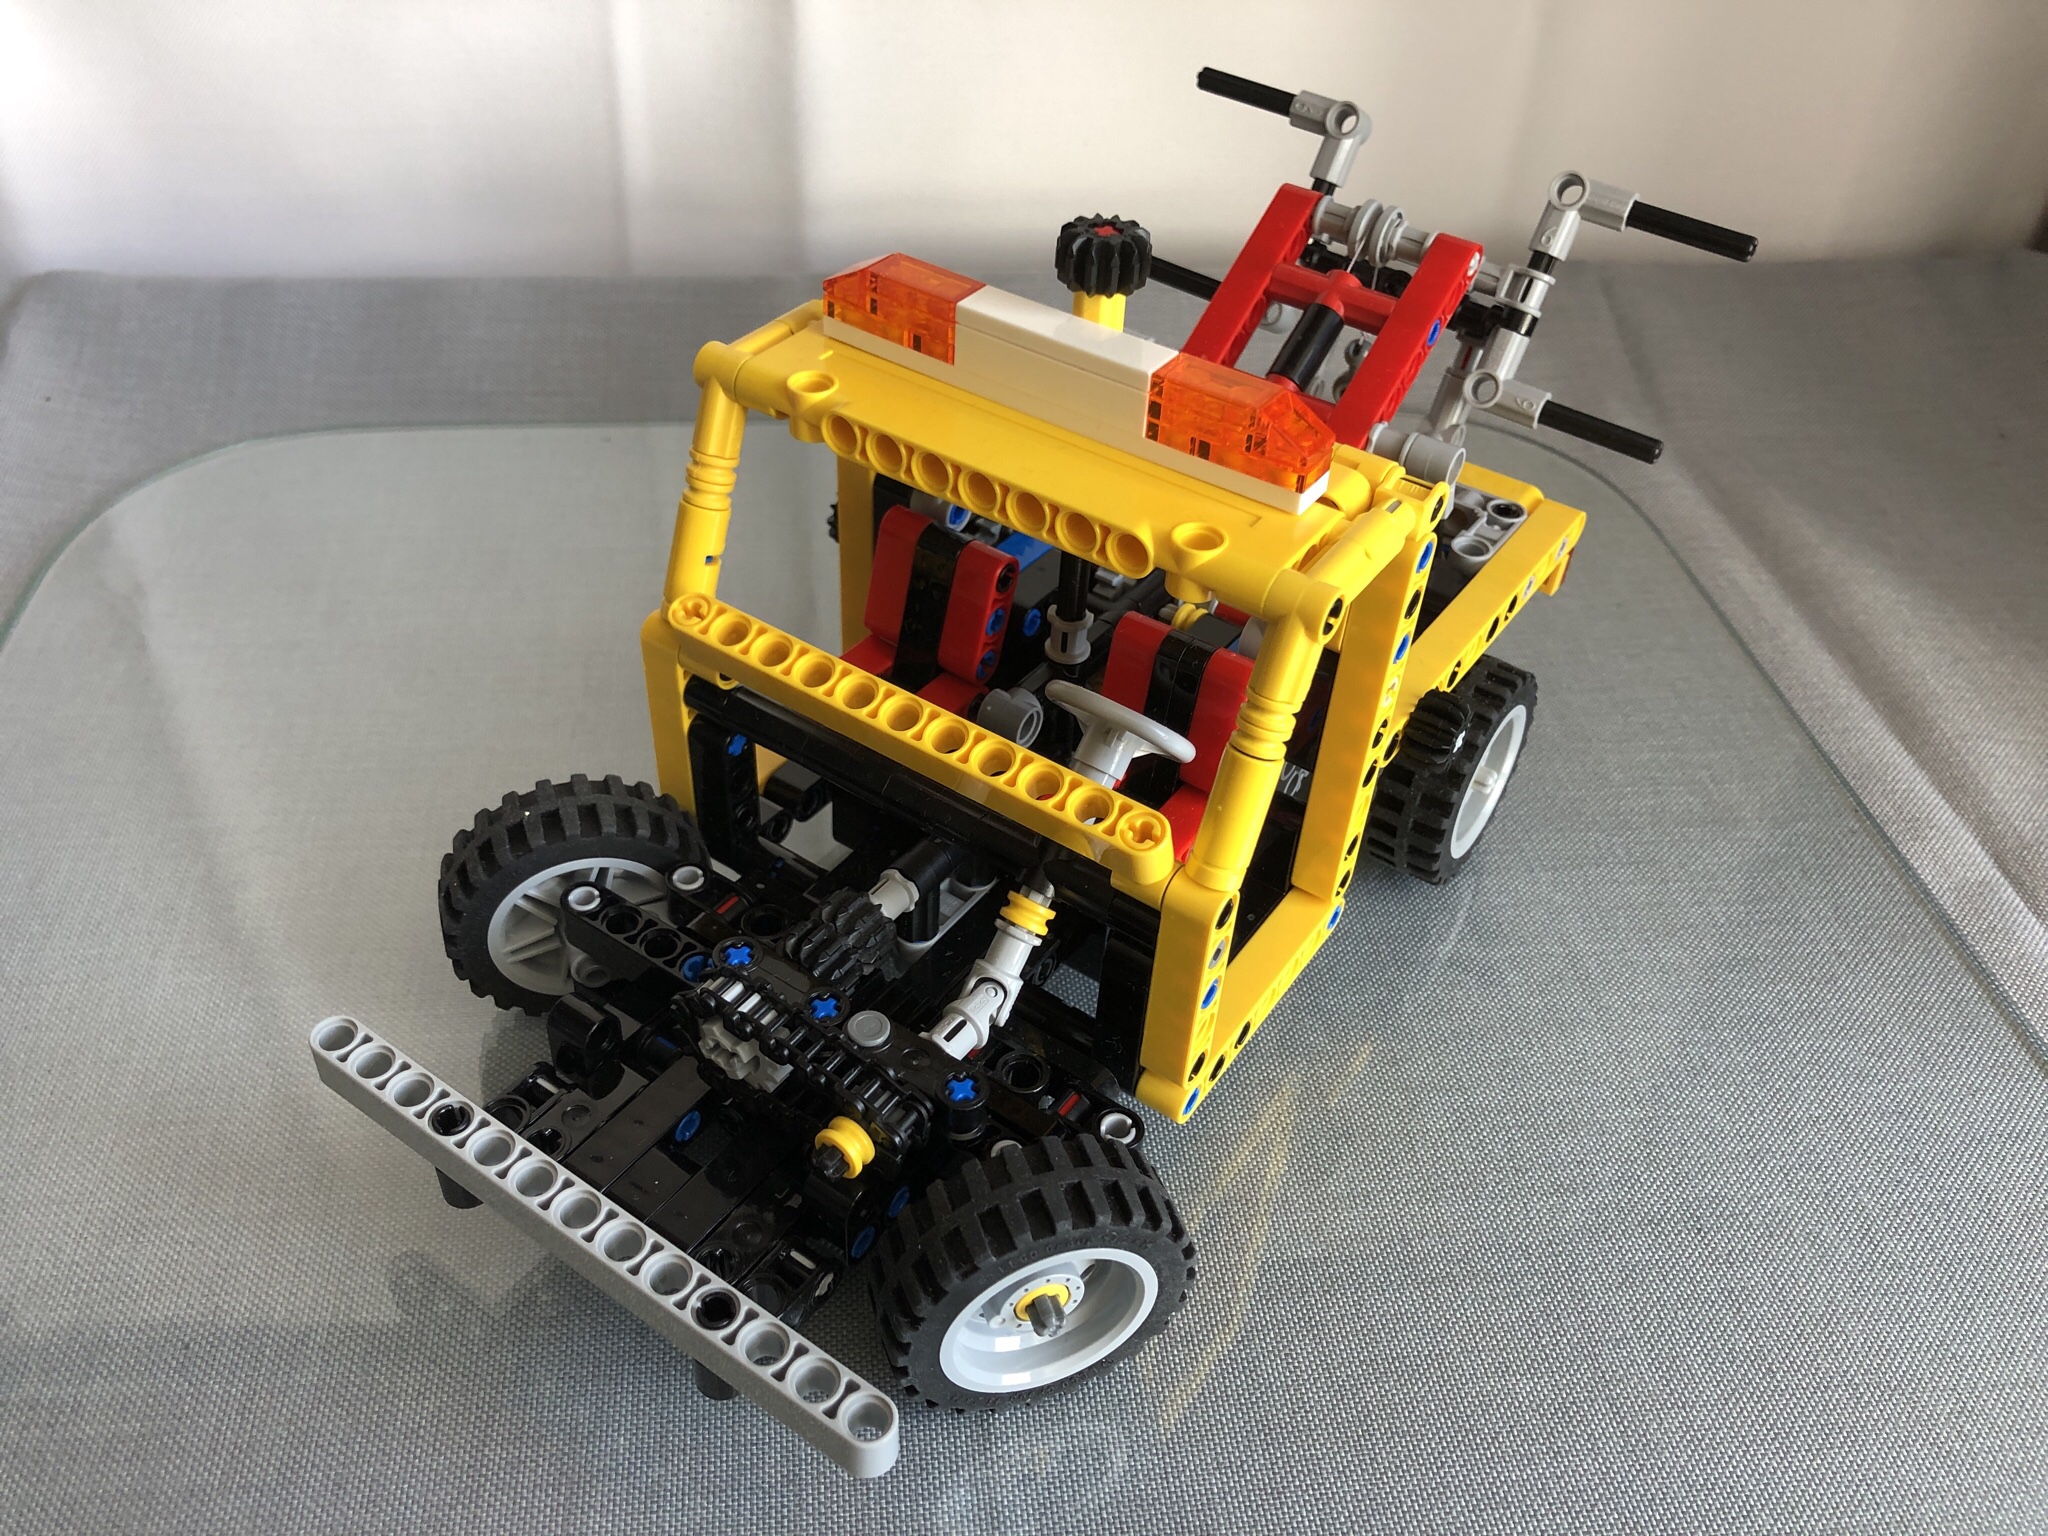
I was able to include all functions of the original model. Here you can see the steering system with steering wheel and HOG steering connected with a chain instead of a rubber band. It works a lot better this way.

Unlike the original model the new one can open the bonnet. The winch can be driven by the spare wheel when the bonnet is closed.

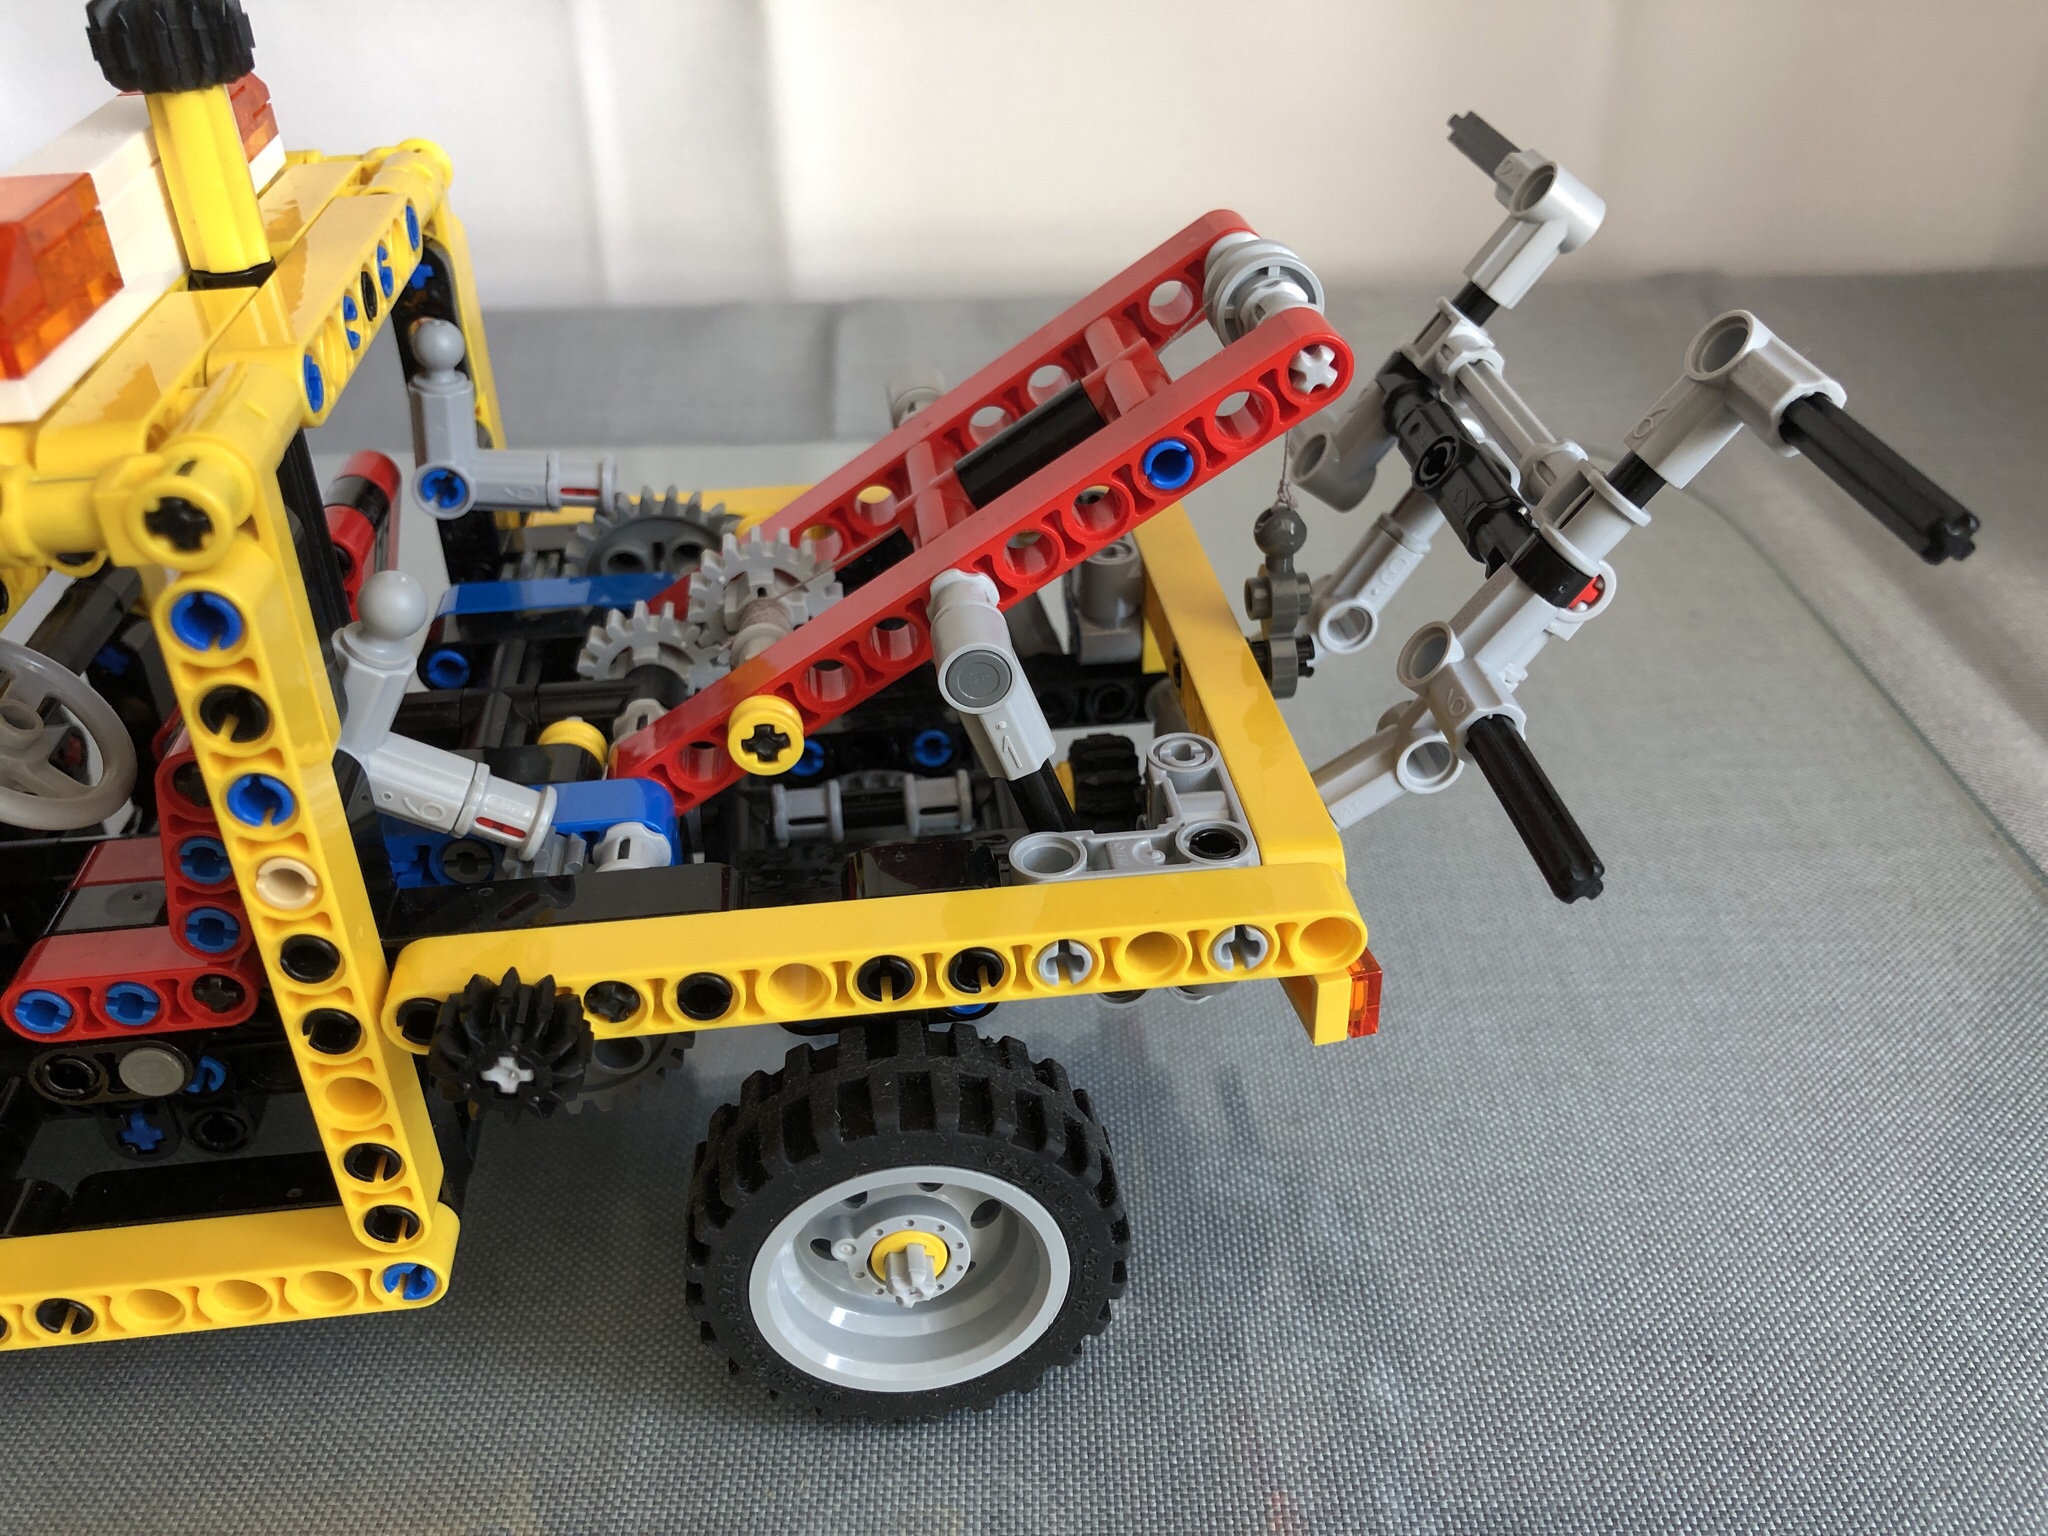
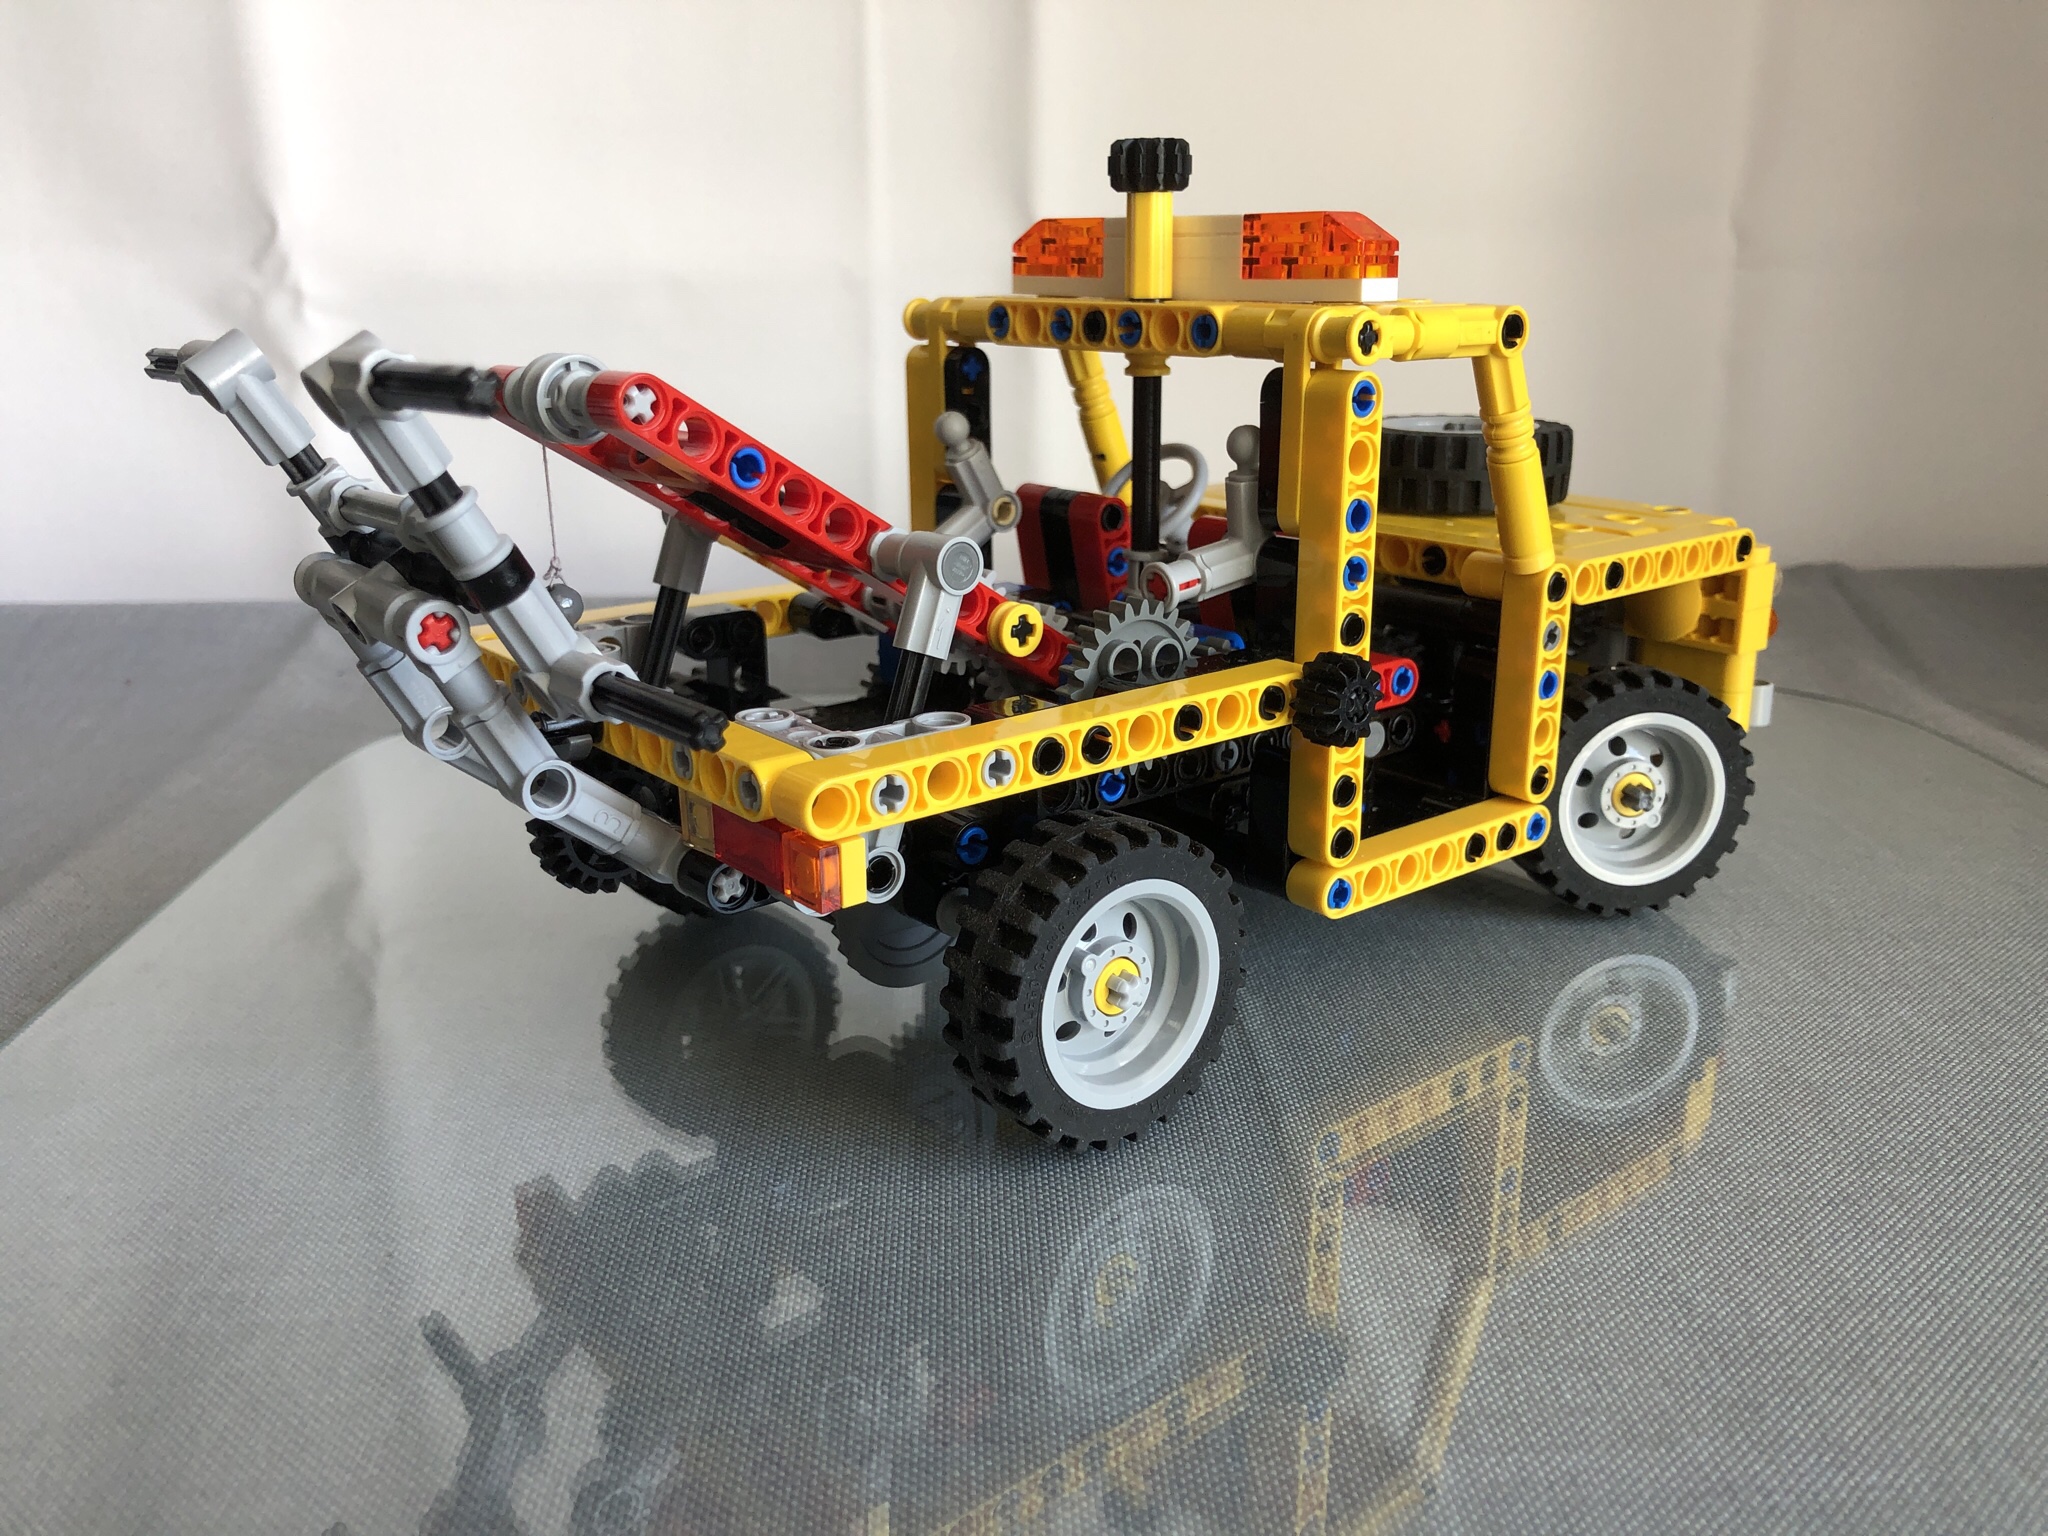
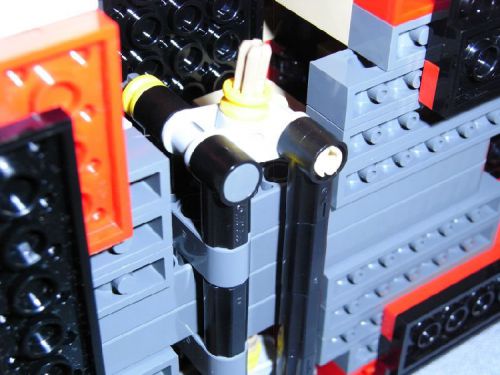
The “fork” mechanism works just like on the original model. I only added an additional lever on the blocking mechanism.

The rear winch is very similar to the original model. I’ve just added a pair of gears because I needed the space in the middle of the lower axle for a connector. As usual on newer models, most of the functions are operated by the small black double bevel gears.

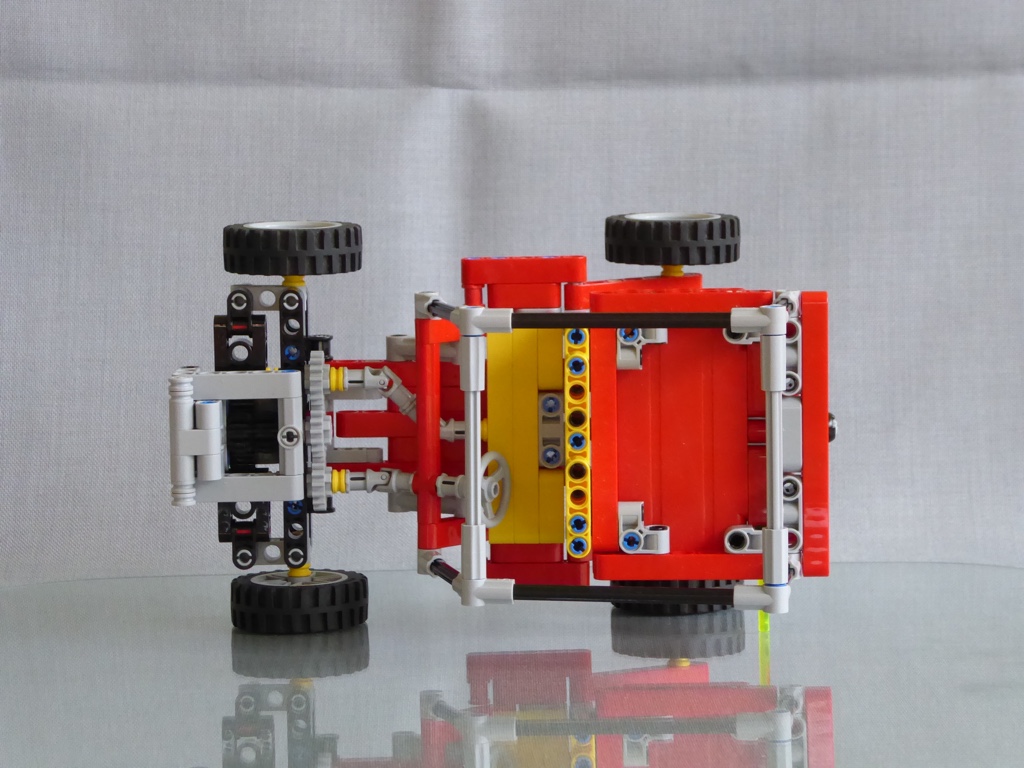
You can easily take off the body work.

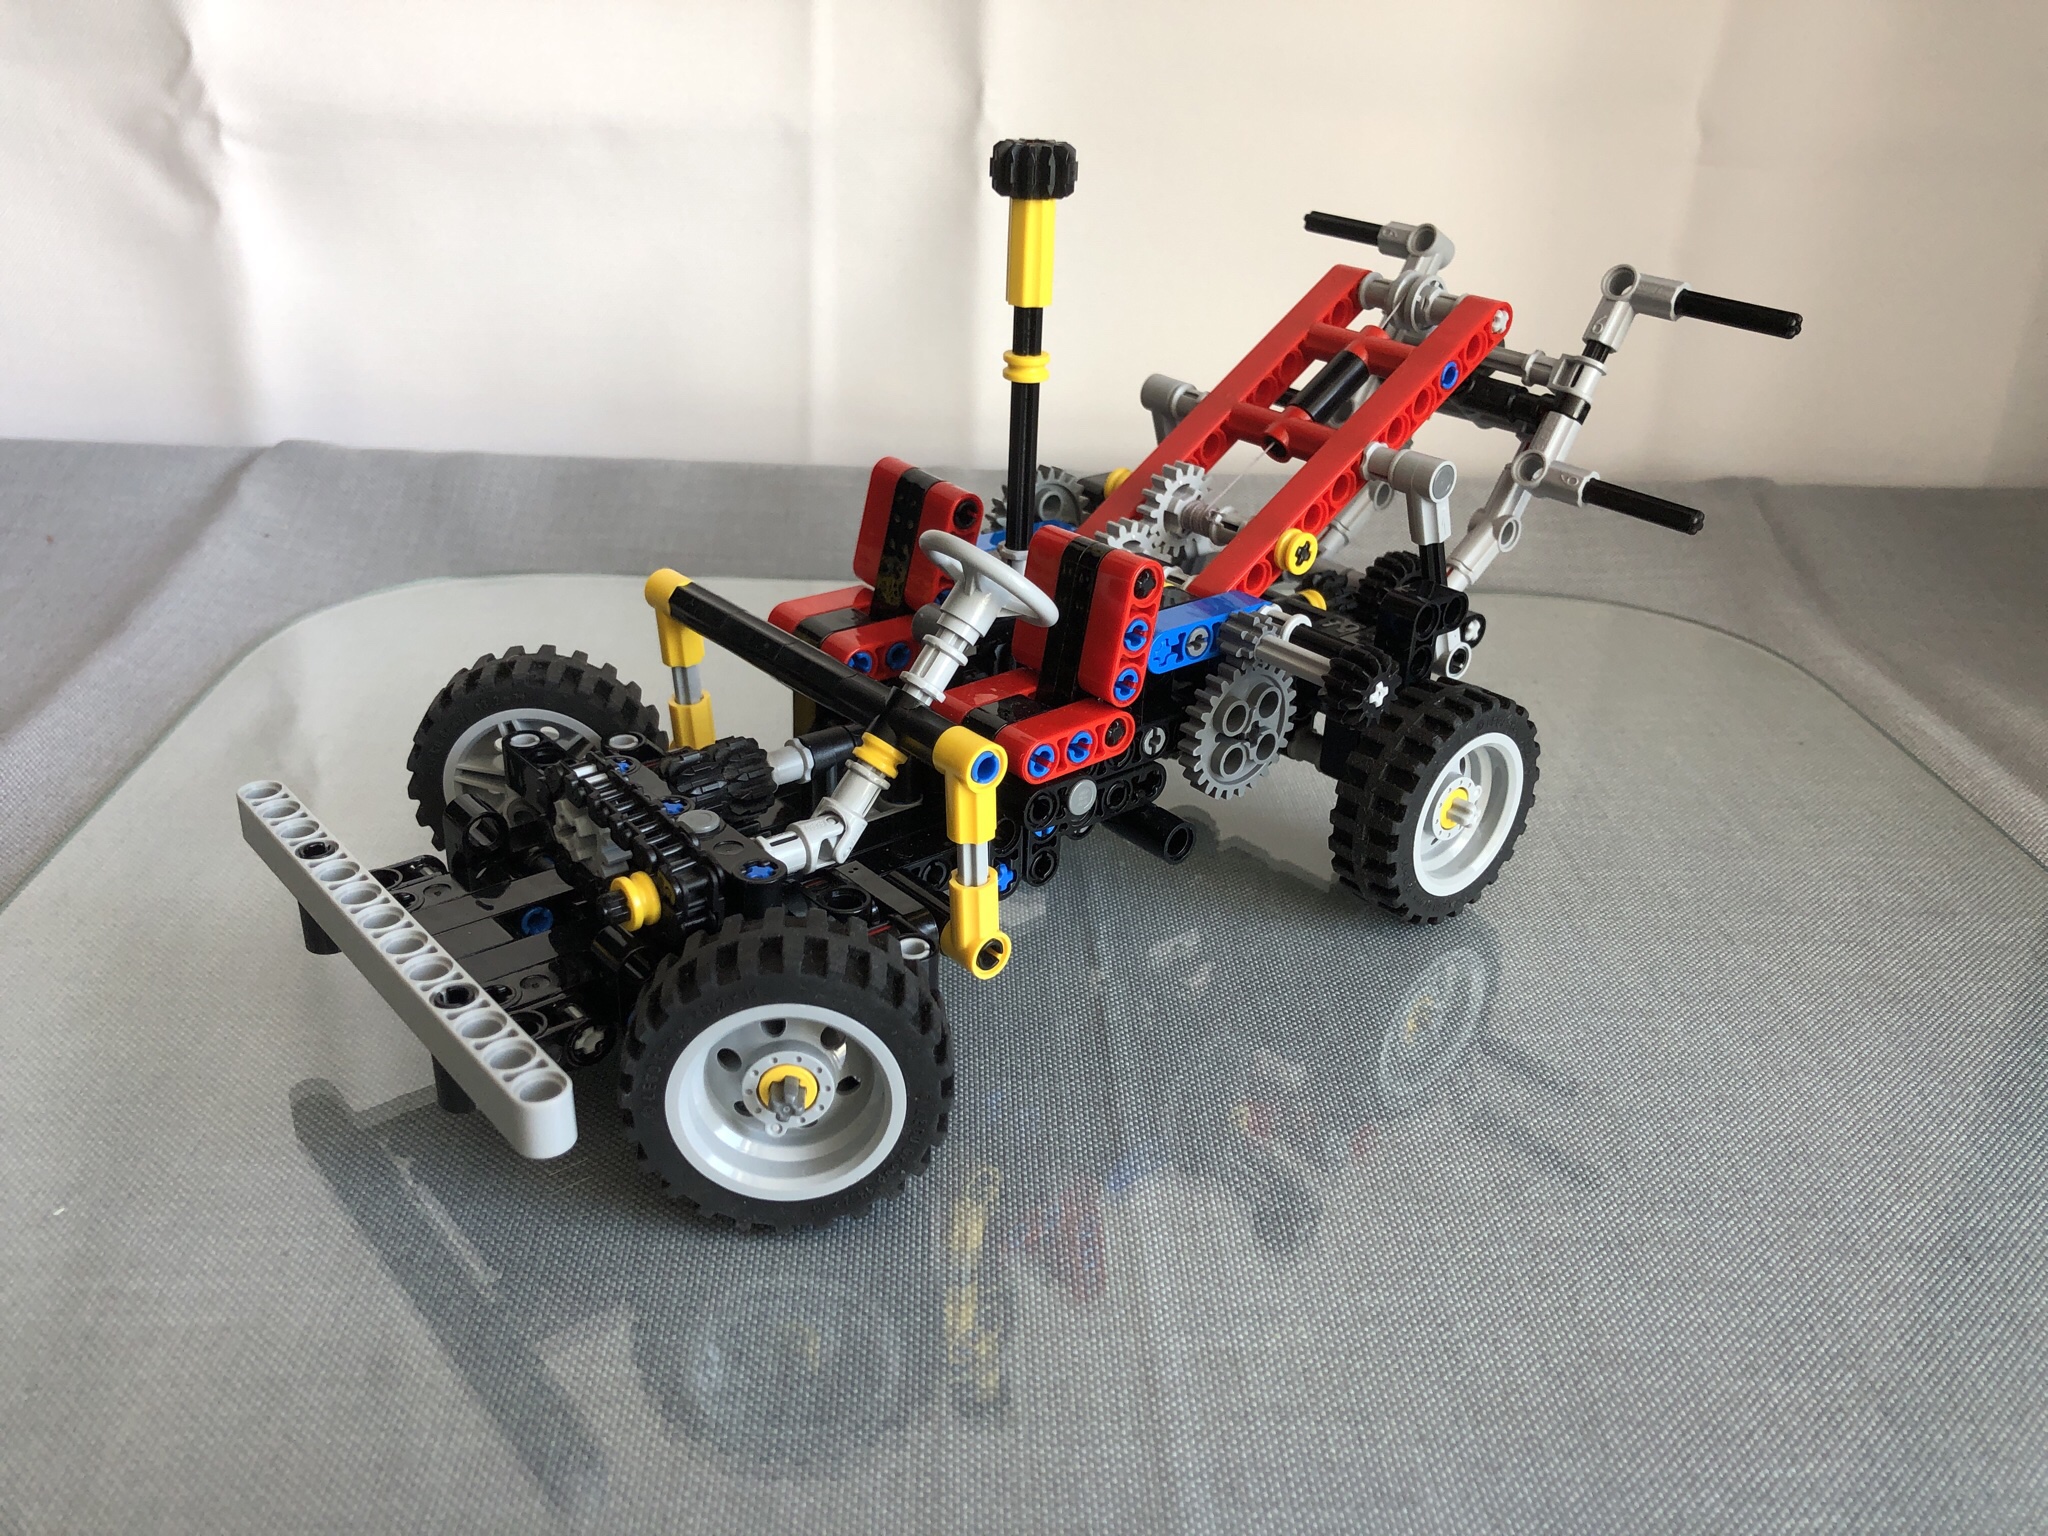
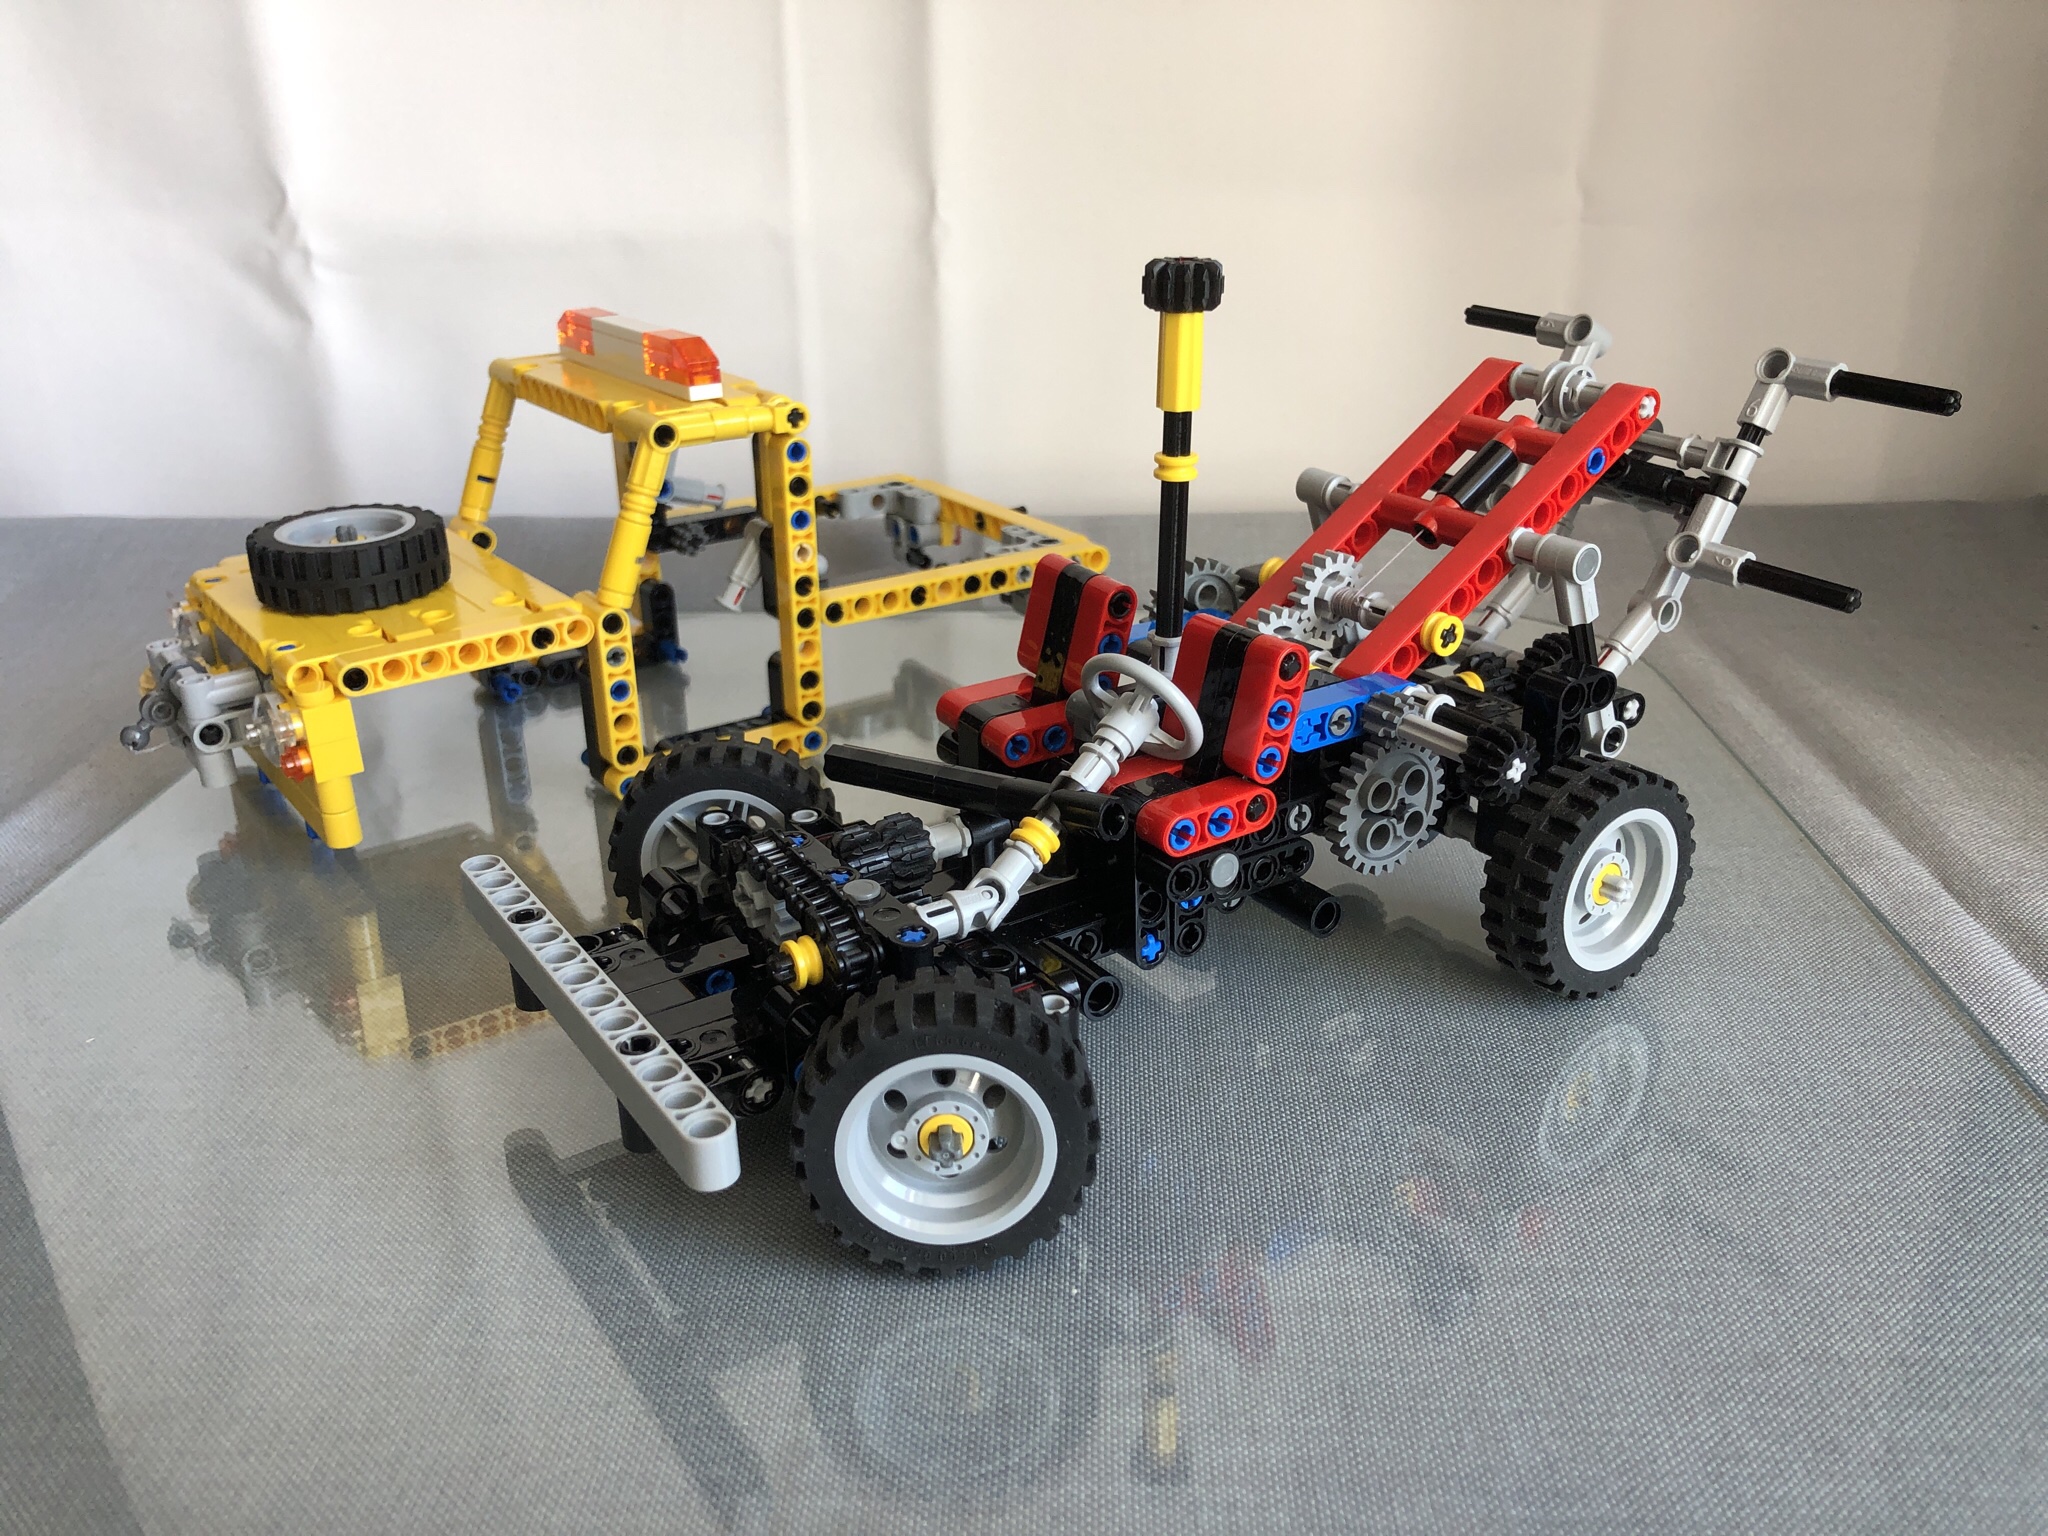
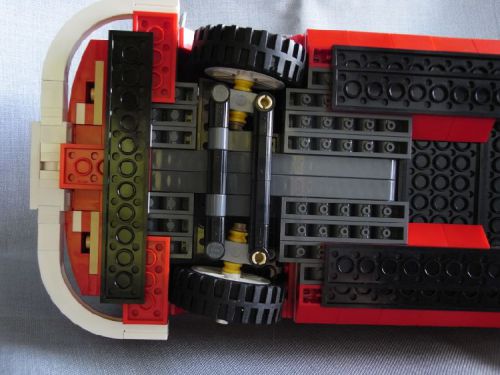
Just add two simple supports and you get a working rolling chassis.

Side view comparison: The silhouettes match exactly.

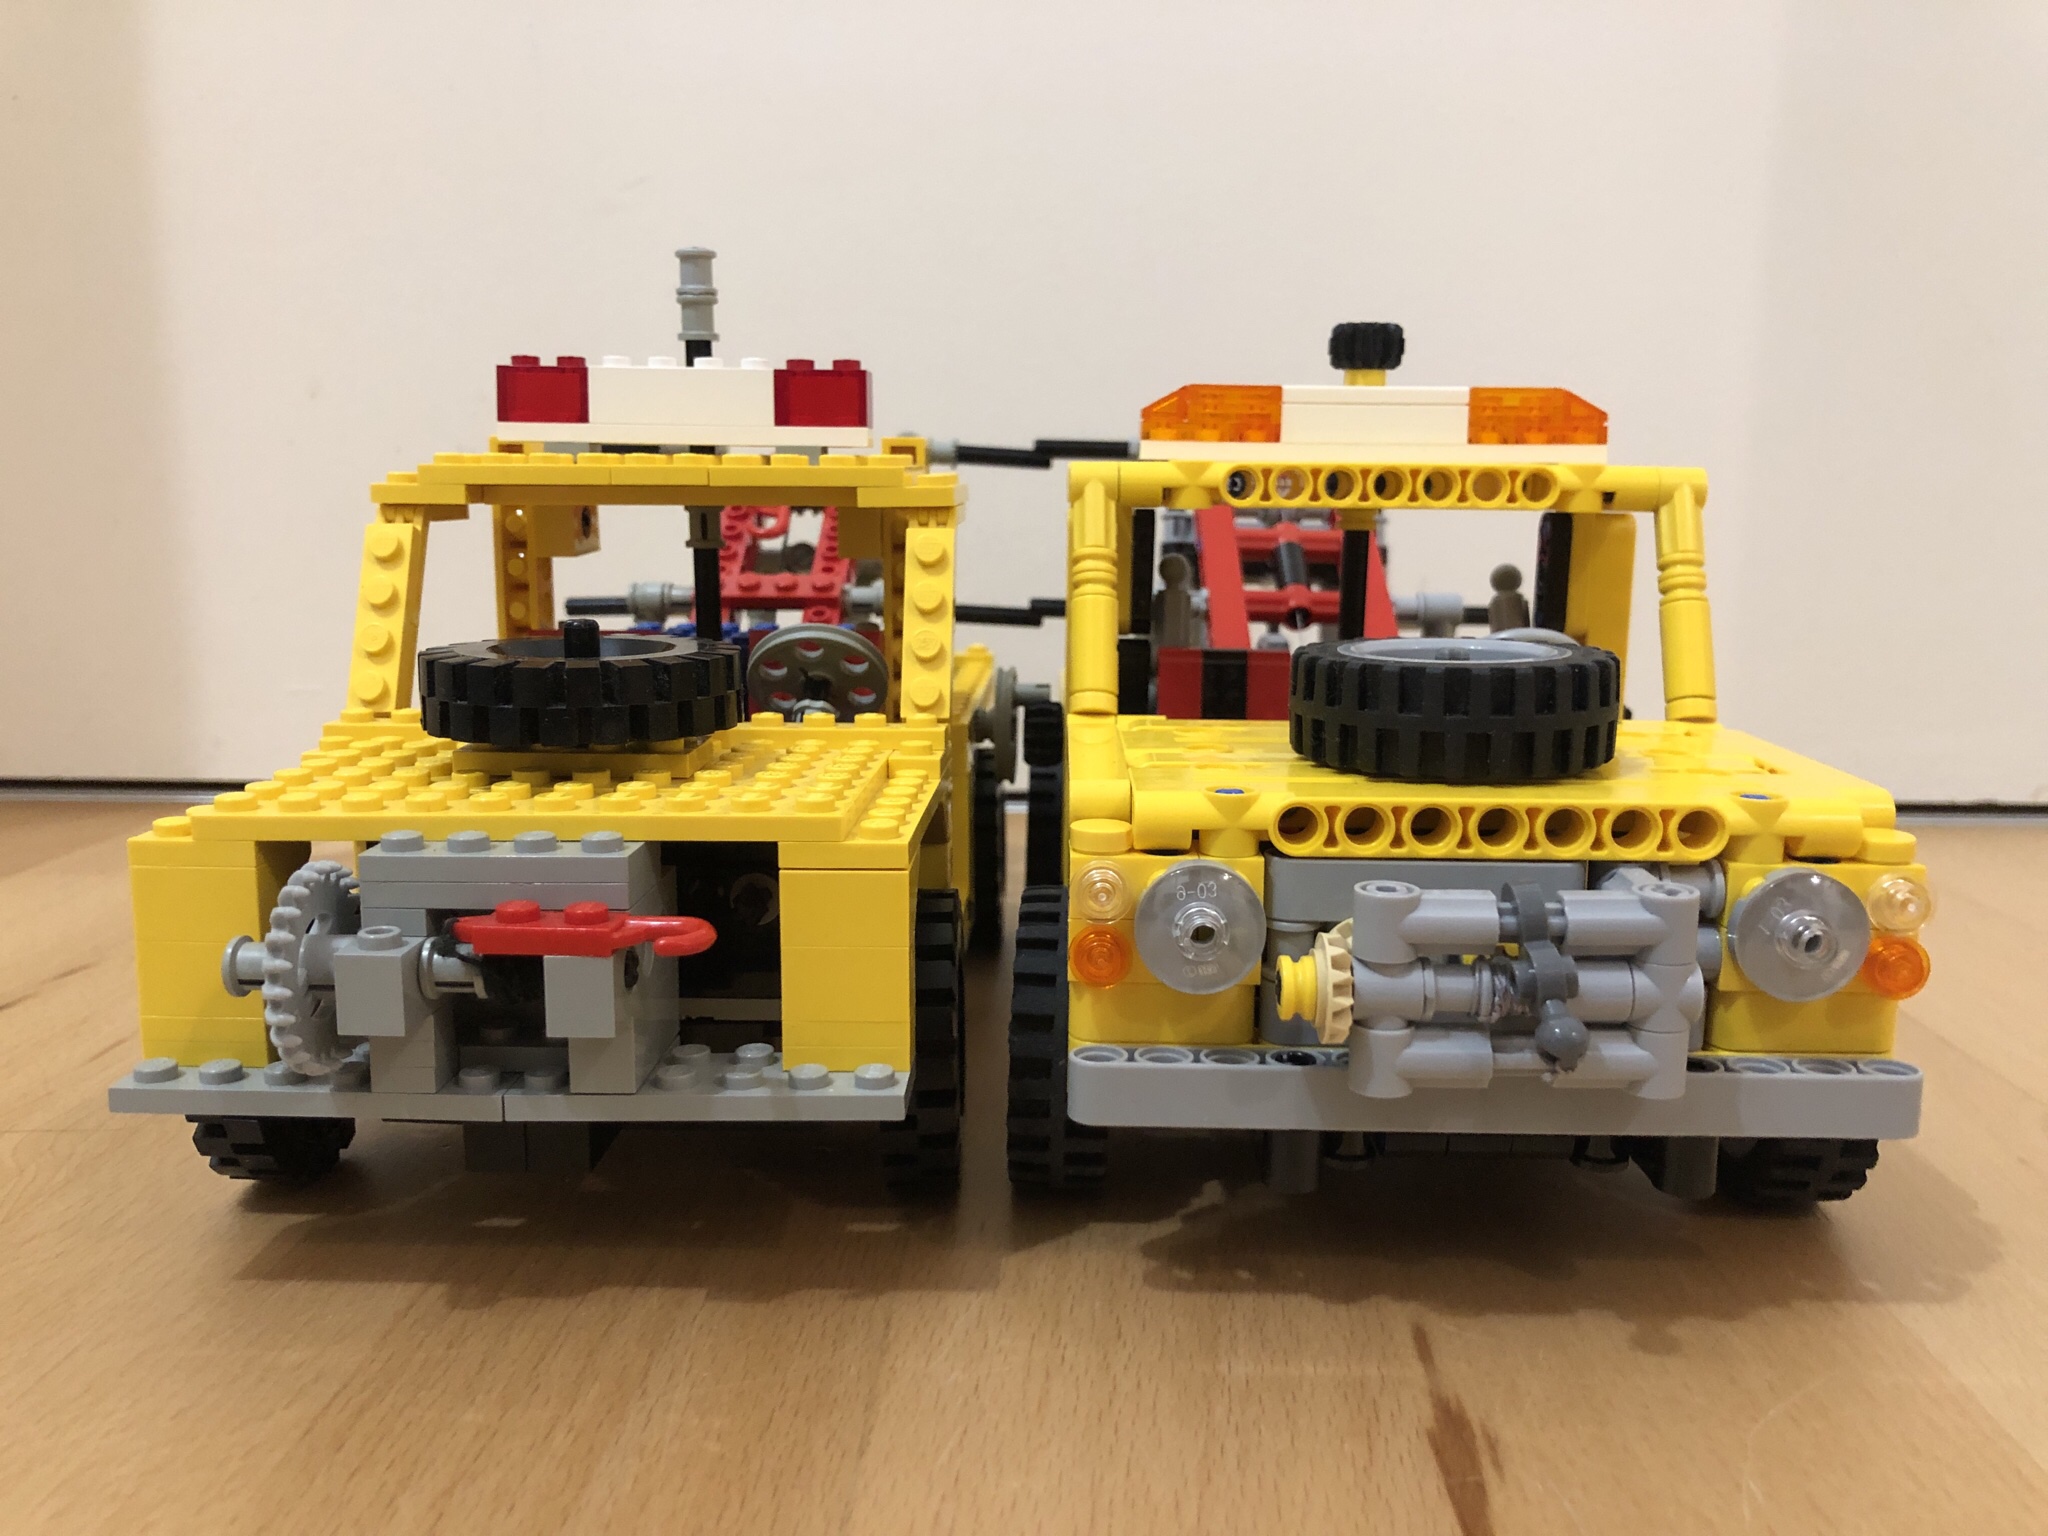
Front view comparison: Just like my 8845 Dune Buggy before the new one is one stud (or hole) wider than the original to get the typical “odd width” of new Technic models. Head lights have been added, emergency lights, spare wheel and HOG steering have been replaced by newer versions.

Rear view comparison: Everything is one stud wider, tail lights are new. With all the new parts and details the new one has 561 parts instead of 379.

So this is my new studless Lego Technic version of the classic Tow Truck from 1982 with the image that started the whole thing.

I hope you like it! :-))

Bonus picture:

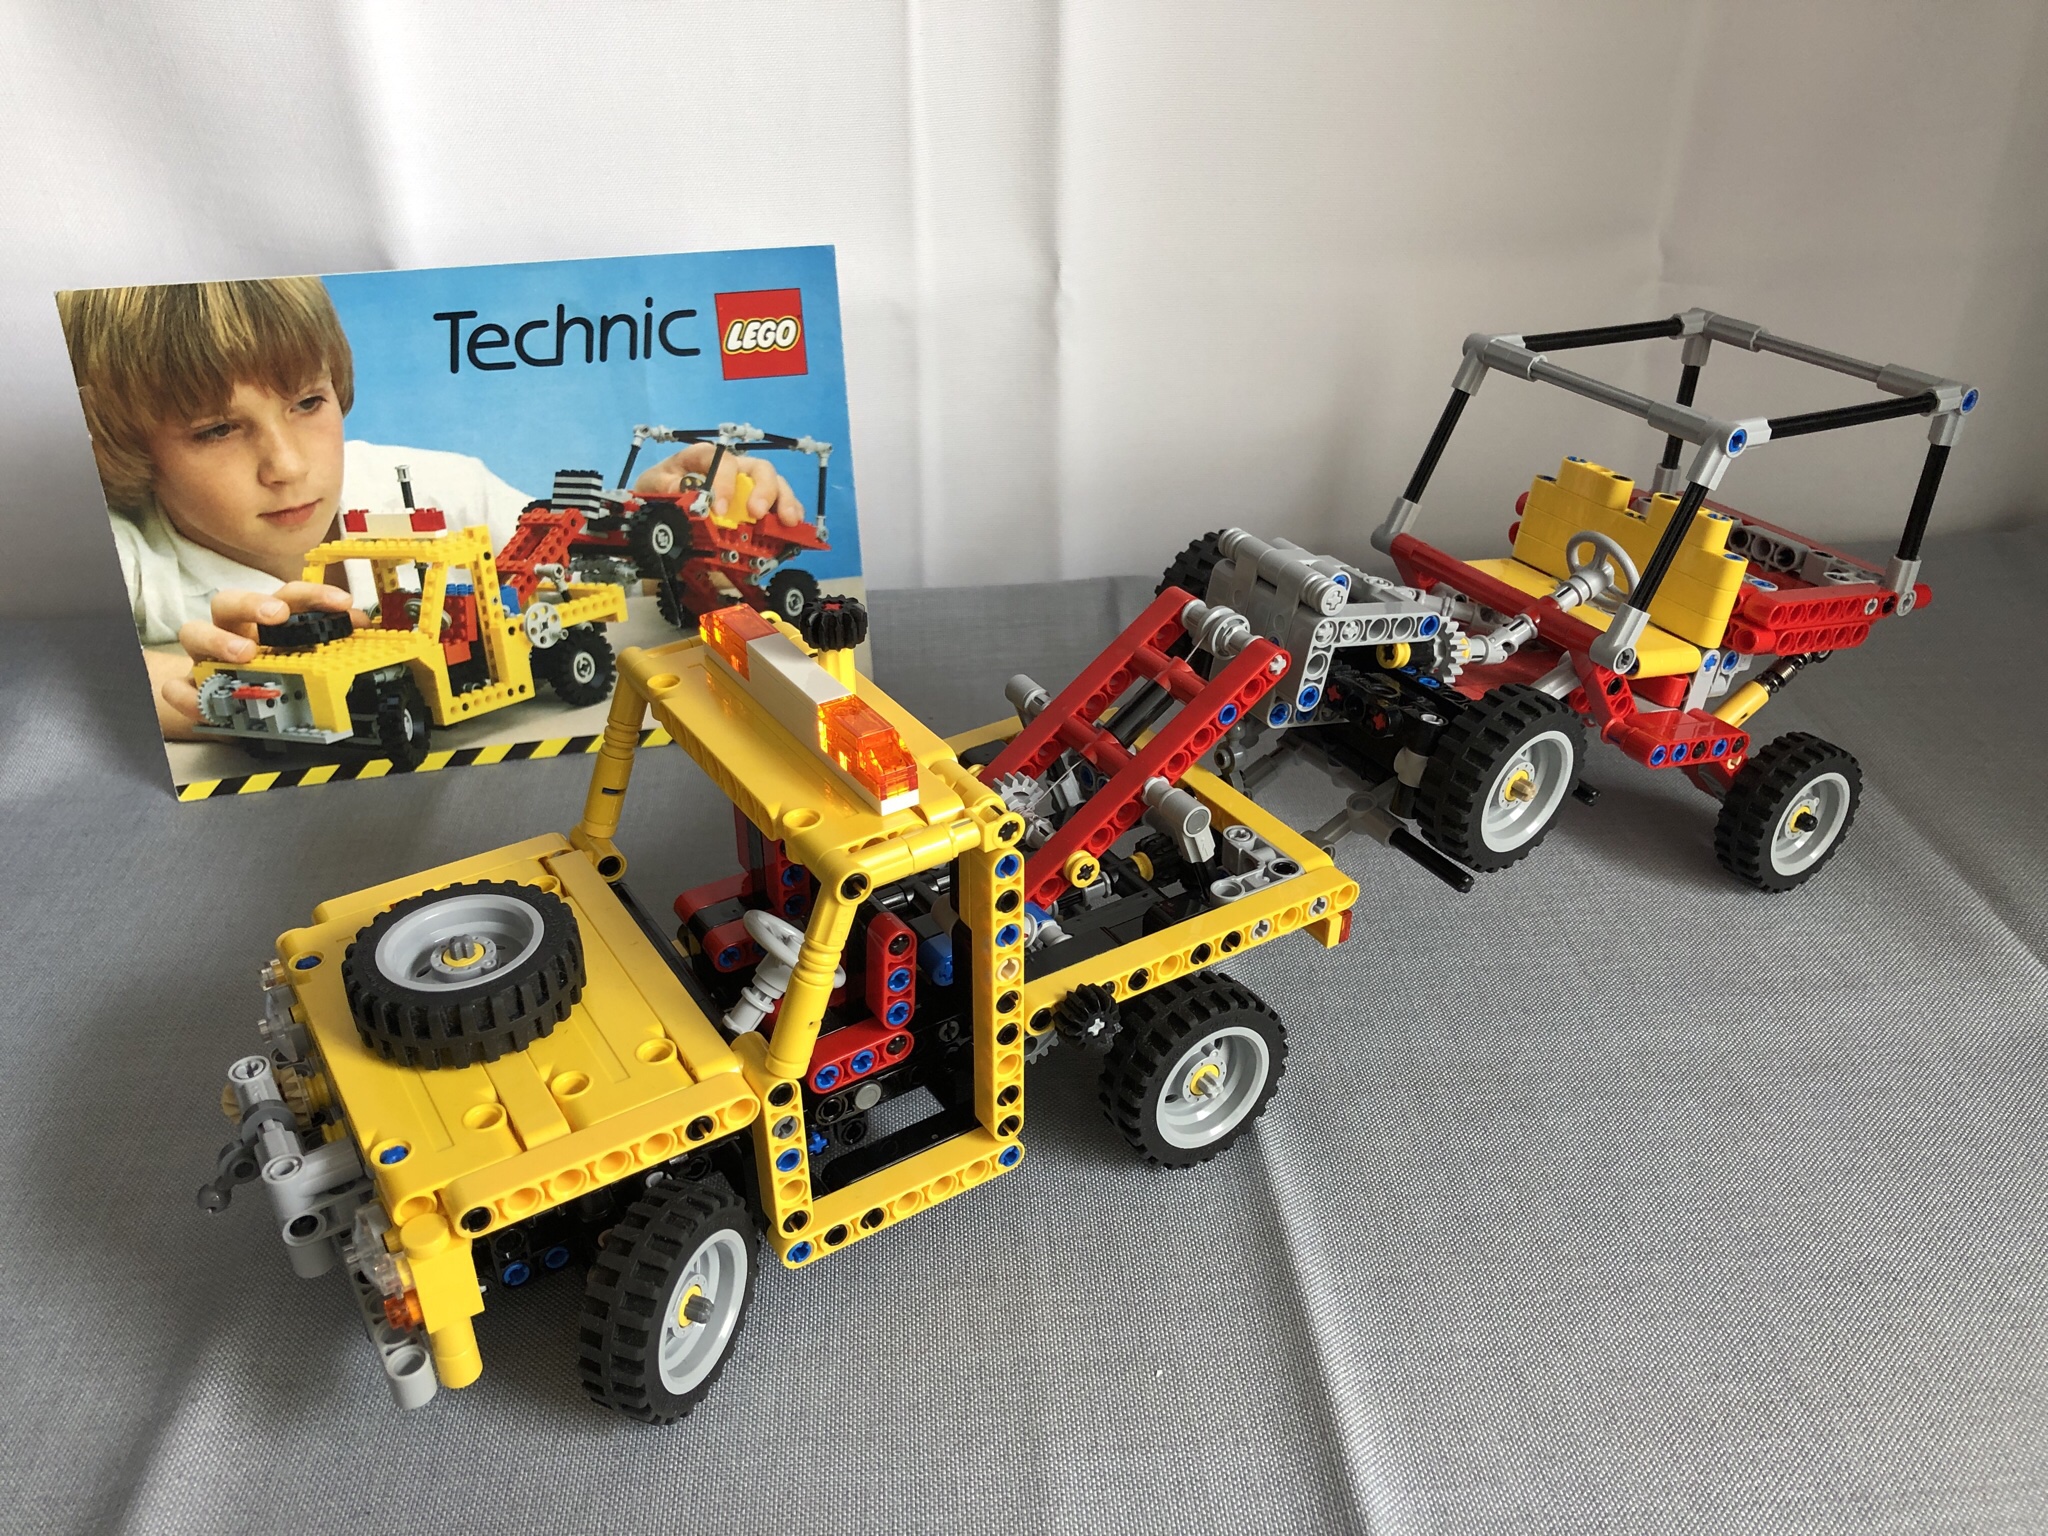
Family meeting – 8845 and 8846, old and new (father, son, uncle and cousin) ;-))


Mini Luxo Jr.

A miniature Lego version of Pixar’s “Luxo Jr.” desk lamp.

I’m a big fan of Luxo Jr., also known as “The Pixar Lamp”. The short film “Luxo Jr.” was Pixar’s first CGI film and since then the lamp has become kind of a trade mark for Pixar.

There have been a few cool Lego models of Luxo Jr. and I wanted to give it a try myself. My goal was to build a mini model which should be able to “move” almost like the original desk lamp.

To get a feeling for the kinematics I started with a simple, bigger Technic frame built with Technic beams and liftarms:

But I wanted to have a smaller version, so I replaced the beams with shorter half beams and the Technic pins with 3L bars. The result was my first small “working” Lego version of Luxo Jr. (the lamp on the right). For a better look I replaced some of the half beams with combinations of bars and bar holders with clips (the lamp on the left).

Both lamps have two sets of liftarms in parallelogram shape (diamond shape to be exact), connected with an L-shaped liftarm. So they can “move” almost like the original Luxo Jr. lamp.

That’s it: My “working” miniature Lego version of Pixar’s Luxo Jr. desk lamp. I hope you like it! :-))

I’d love to add an LED light. I’m still looking for the best solution to do that…

Bonus photo: My son wanted to have his own “Pixar Lamp”, so I built a third one for him with parts that I found in my boxes.

21303 Wall-E with Power Functions RC

A mod of the 21303 Lego Ideas “Wall-E” set adding Power Functions motors and remote control.

When I saw the official Lego Ideas Wall-E set I knew I had to have one. But with 50,- € it wasn’t cheap at all, especially considering the extra 60+ € that I would need for the Power Functions elements to motorize the set.

When I decided to go for it anyway, it was almost too late for that. I was lucky to get a set without box or instructions at the original price. That was OK for me, but not my original plan ;-)).

The plan was: “No Wall-E without Radio Control!”. So I started looking for possible solutions other fans had found.

The most popular conversion is the one built by Youtube user PPung Daddy, but I wasn’t really satisfied with it. The cables of the motors were positioned too close to the ground, the battery box wasn’t really fixed and the IR receiver looked almost like a backpack.

So these were my main tasks when I tried to build my own version of an RC Wall-E.

I looked for better positions for the M Motors, but the best thing was just turning them by 90 deg to position the “cable exits” on the rear side. The motors are fixed by two Technic pins, the driving axles and 10 SNOT 1×2 Technic bricks with cross axle holes.file-d68dd6e4-684b-4e0d-92c2-e175cf0b421c-13893-00000dfc3d5d8d36

There isn’t much space inside Wall-E’s “belly” so I looked for the lowest possible position to locate the battery box. I built a new ground plate with a 4×8 cut out, so the ground plate of the box is now part of it. For this solution I had to get rid of the hinges of the front plate, but that was OK for me. Now the plate is just fixed by four SNOT studs.

The front of the box rests on two 1×2 Technic bricks with cross axle holes, which are fixed by an 8L axle running through them. To change the batteries you just remove the axle, then you can flip down the box.file-1ce1fd37-e838-409d-b23c-072820c24e7e-13893-00000dfc3f807535

file-fed0048e-0dd9-43d4-8a03-2daad443ebe0-13893-00000dfc422e93a5

You can switch the battery on and off by pressing the lime green lever. The hole in front of the neck part is big enough to do that without removing any parts. Looking inside you can even see the green LED of the battery.

file-2271bcd3-cb64-429b-9c2c-69404f9c239e-13893-00000dfc40c87a9c

The neck of the robot is fixed in a higher position, so the lower neck piece is one stud shorter to keep the original look.

With the lower position of the battery box it was possible to locate the IR receiver on top and more “integrated” into the design of the robot.file-d4c8e8d9-315c-49c4-b6e1-a6cf2e72e3a9-13893-00000dfc3e887f1b

With the rear panel fixed by one of the original 1×4 SNOT bricks and a modified plate with hinges on top Wall-E’s rear side looks almost like the original model. And I think even the motors look OK where they are.

I’m really satisfied with the result. The only thing I’d still like to improve is the fixation of the motors. Even 10 studs for each motor aren’t strong enough to keep the motors in position for a very long time. The torque is just too high for that. But that’s OK for me (for now).file-7def1f8d-a72e-4fa2-be42-88d358567d57-13893-00000dfc3c4975d9


So, this is my Lego Ideas 21303 Lego Wall-E with Power Functions motors and remote control (RC).

I hope you like it. My son does ;-))

NILSOBRIX: 21303 Wall-E with Power Functions RC
BrixBlog | flickr | MOCpages | Youtube

8845 Dune Buggy Reloaded (Studless Technic)

img_0510

A new (studless) version of the classic Technic 8845 Dune Buggy from 1981.

Yes, I’m a big fan of the 8845 Dune Buggy, I still am. I’ve already had the idea for this classic model built with new Technic elements a few years ago. I started building an LDD model and then I kept “in the drawer” until it was time to build it “for real”.

I remembered my “old love” a few weeks ago when I wrote a review for the original model for The Lego Car Blog and I thought: “That’s so cool, maybe now it’s time to order some bricks for it”. But when I looked at the LDD model the first time after all that time I wasn’t a 100% satisfied with it, anymore.

So I started optimizing the design a little until I was. Then I uploaded it to Bricklink into a new Wanted List and used the new “Buy All” function for the first time. The experience was just “Wow, it has become so easy to get all bricks!”

After a few days I had all the bricks and got started immediately when the last of the three envelopes arrived. This was the result a few hours later:

img_0513

The basic design is as close to the original as possible. Most “old” 8L bricks are now 7L beams, 8L bricks are 5L beams, and so on. The roll cage has the same dimensions (in the side view) as 8845 and the angles between the axles are the same, too.

img_0514

The main differences are: The new one is one “stud” wider, the wheelbase is half a “stud” longer and I’ve added a second beam on each “lever” of the rear suspension to add some rigidity.

I’ve also added a HOG steering, something I had done on my old model when I was a kid (As I didn’t have an extra gear for the “right side” I used a longer axle going through the steering wheel, a second cardan joint and another axle plus a “spare tire” for the steering).

Here I used an additional gear on the front, a complete second steering column and a small black ball as “steering wheel” for the HOG steering (I tried out quite a few elements, even a spare wheel – but I think the ball looks best and it really works fine).

img_0515Top view: You can see the front part of the HOG steering.

img_0516
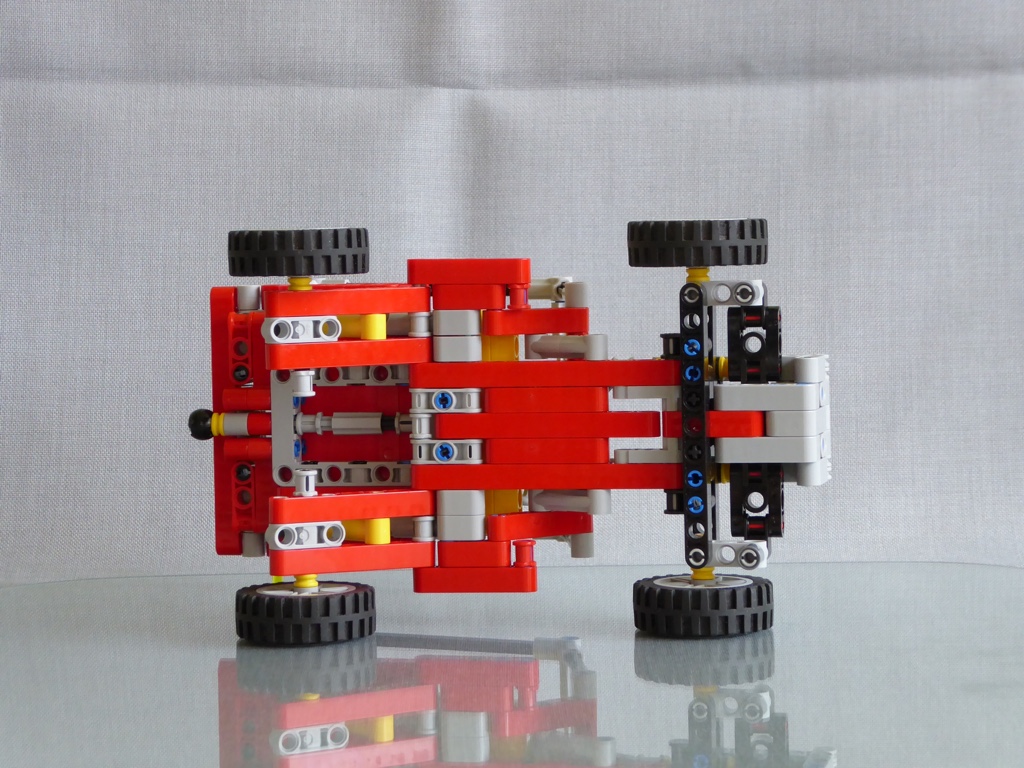
Bottom view: And here is the rest of it.

img_0518
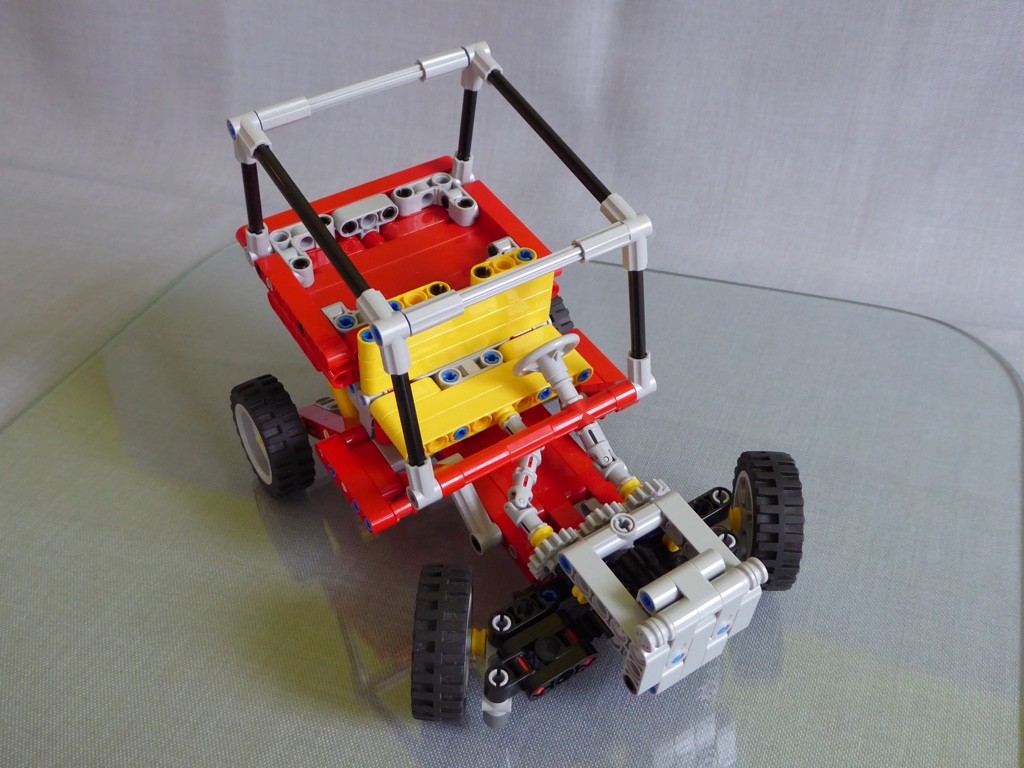
Bird’s view: Looks cool for me…
And it’s so much fun to play with it, especially for my 3-year-old son.

img_0519
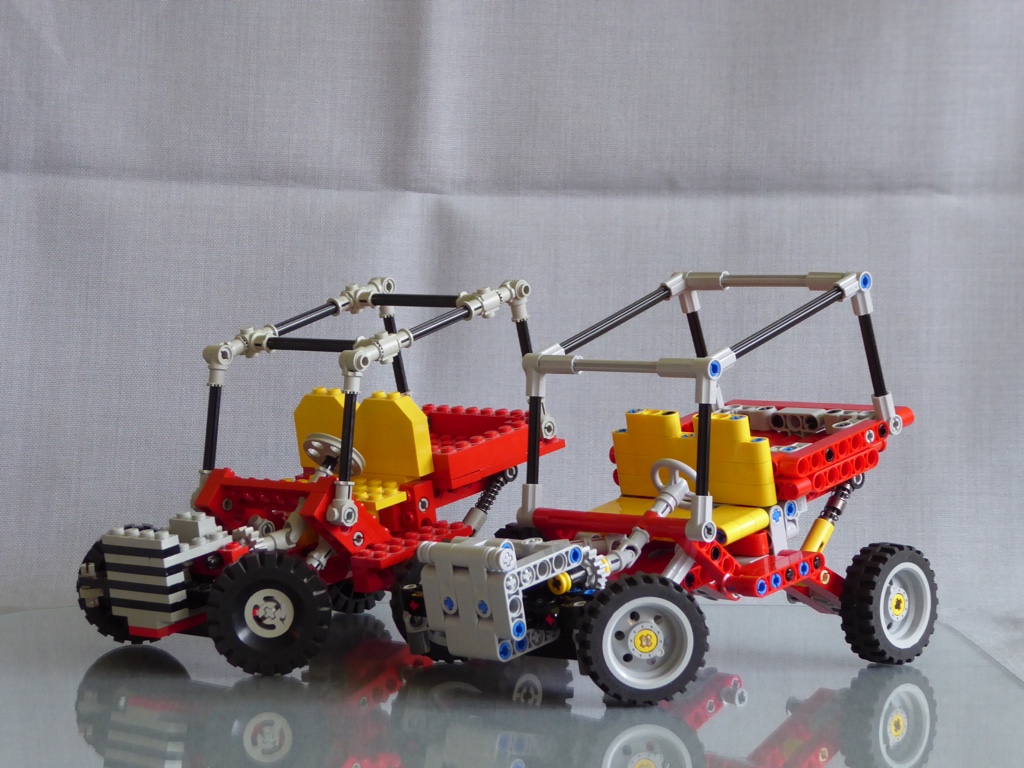
The Next Generation: 8845 and his studless new friend.

With the studless model finished I also got my smaller versions of 8845 out of the glass cabinet and reworked the roll cages with new holders and rigid tubes.

img_0526
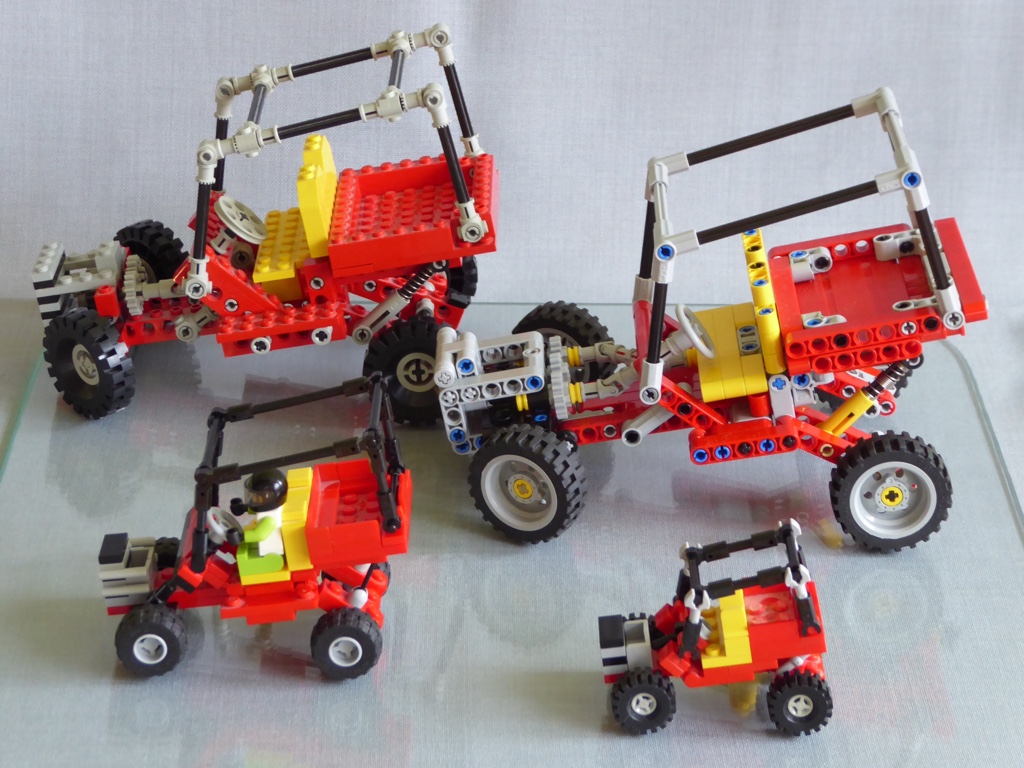
Family picture: The classic 8845, the new studless model, the 6-wide Minifig model (with BrixoNils at the wheel) and the 4-wide model.

img_0511
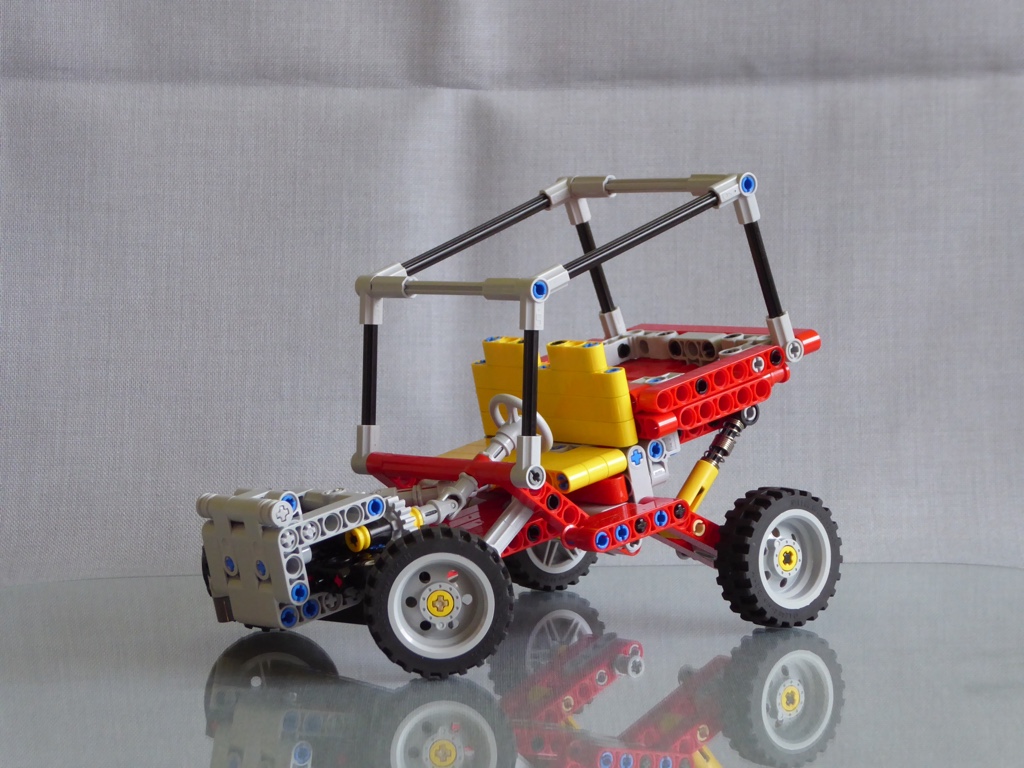
So, that’s my new studless version of the classic Lego Technic 8845 Dune Buggy. I hope you like it :-)) – Maybe not as much as I do, but who could expect that? ;-))

MOCpages Backup: Presentation Platform for Small Scale Vehicles

A MOCpages backup

Rated 5 out of 5 (35 ratings)
2,560 visitors
21 comments
Added May 27, 2014

Presentation Platform for Small Scale Vehicles

A platform for presentation and photography of small scale LEGO vehicles.
The idea was a platform for the presentation of my 4-wide vehicles, especially to take photos from different angles without changing position or zoom factor of the camera. I started with a square platform based on a 16×16 base plate, but the platform was a little small to get a reflection of the whole car on the platform. Black was the best colour to get a cool reflection.

The ideal form would be a circle. An octagon formed by four 10×10 plates with 45 deg cutout was already getting close. A circle formed by 16 round 1×1 tiles (representing spots in the floor) added some extra coolness.

In the center of the platform there is a little turntable to change the angle of the car in front of the camera without “moving” the car itself:
Transparent plates, tiles and jumper plates are used to fix the car on the turntable.

For an “odd” length of the model (in studs) the jumper plates are used to center the model on the platform.

For an “even” length of the model the plate and the tile are used.

Just turn the turntable…

… to change the photo angle of the model …

… without changing the position of the model on the photo.
You only need a tripod to freeze the position of your camera ;-))

It works great for an animated GIF, too.

So this is my presentation platform for small scale LEGO vehicles.
I hope you like it :-))

MOCpages Backup: Lighthouse in a Bottle

A MOCpages backup

Rated 5 out of 5 (48 ratings)
5,553 visitors
31 comments
Added January 1, 2013

Lighthouse in a Bottle

A microscale version of the German lighthouse “Westerheversand” built in a bottle.

I definitely left my comfort zone for this one. My Dad is a lighthouse fan and travels a lot to take photos of these unique buildings. For his birthday my mother had the idea to build a LEGO lighthouse in a bottle just like I had done with my Lamborghini Countach.

I picked the lighthouse “Westerheversand” because it is one of the most beautiful and famous German lighthouses and one of my dad’s favourites.

Microscale buildings are far away from my comfort zone. Considering that, the design process was a lot a fun. Just like for the Countach I built modules small enough to go through the bottleneck and then mounted them inside. These are the modules:

The most difficult part was to find a bottle in which I could build the model. It had to have an almost square shape in the front view and a big bottleneck for the Technic “belt wheel” I used for two platforms. A Whiskey bottle had the right size for the lighthouse but the opening of the bottleneck was smaller than it looked from the outside.

So I had to cut off a part of the bottleneck to get a bigger opening:

The opening now is just big enough for this wheel:

And this is the result:

Another front view, now with some daylight:

And a rear view:


This is my micro scale LEGO lighthouse “Westerheversand” built in a bottle.
I hope you like it :-))

Oh, I almost forgot this:
A Happy New Year to all of you :-))

MOCpages Backup: 10220 VW Camper Mod: Steering

A MOCpages backup

Rated 5 out of 5 (24 ratings)
20,139 visitors
20 comments
Added March 28, 2012

10220 VW Camper Mod: Steering

A little mod of my 10220 VW T1 Camper van: A simple steering mechanism

Everytime I had to move my Camper Van on the shelf I missed the possibility of steering the front wheels. The model is quite big and heavy and so it wasn’t easy to “park” it. So I looked for a way to add a steering mechanism without touching the outer shape of the Camper.

I remembered a mechanism shown in a video on the LEGO Creator pages. So I looked for that video and started to build this mechanism into the front of the Camper with LDD. I had to order some of the parts so I had to wait some time before building it for real.

This is the result:
The possible steering angle on the front wheels is not very big, but it’s enough to move the model left and right on the shelf. I didn’t add a limitation in the mechanism, so now the wheels move until touching the inside of the wheel arches. That is not very elegant, but I didn’t want to limit the steering angle even more.

The mechanism is a combination of classic and studless Technic parts. That was the best way to build a compact mechanism and include it into the model without touching the outer shape.

This is how it looks like behind the front wheels

The center pieces of the mechanism are two 3×4 Technic beams in “T” shape. The rest is build around these two beams. The steering is very easy: You just push the model into the direction where you want to go with the model and wheels will follow. In the original video you can see how that works.

So this is a simple steering mechanism for my LEGO 10220 VW T1 Camper Van. I hope you like it! :-))

Bonus photo: The steering mechanism in LDD